简介 之前写的Spinnaker自动化部署Kubernetes-1.23、harbor、Jenkins、Helm、gitlab都是devops常见组件。
文中如有错误或能优化的地方,还望各位大佬在评论区指正。
资产信息:
主机名 角色 IP k8s-master.boysec.cn K8s-master 节点 10.1.1.100 k8s-node01.boysec.cn node-1节点 10.1.1.120 k8s-node02.boysec.cn node-2节点 10.1.1.130 gitlab.boysec.cn Gitlab Harbor NFS 服务器 10.1.1.150
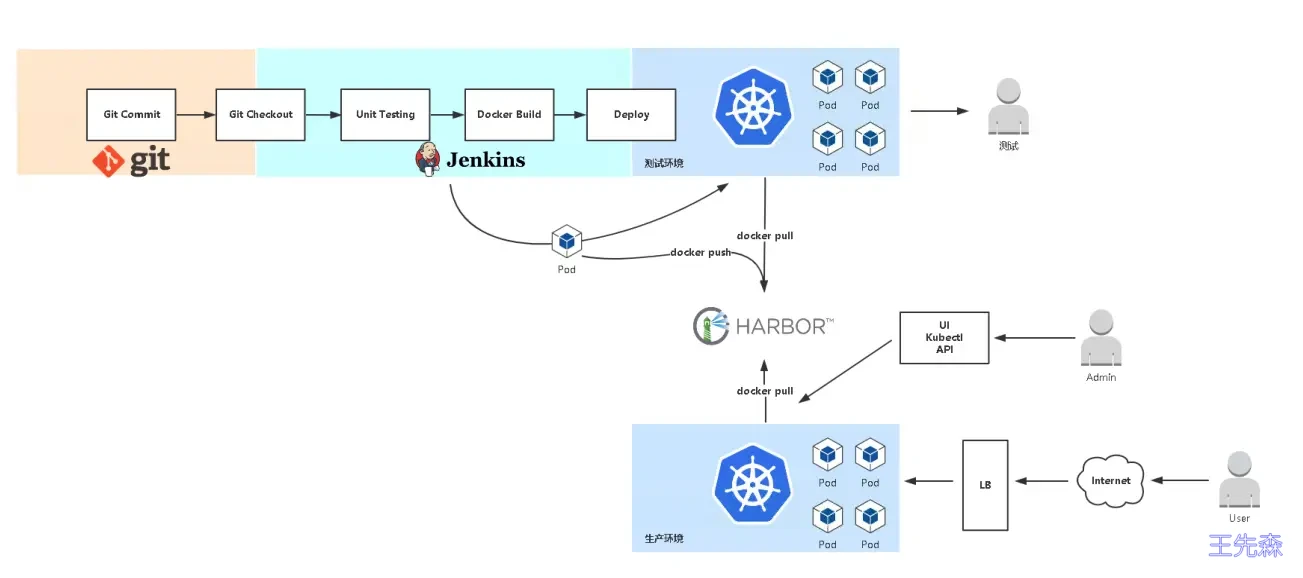
了解发布流程
流程:
拉取代码 git checkout 编译代码 mvn clean 打包镜像 并上传镜像仓库 使用yaml 模板文件部署用镜像仓库中的镜像,kubectl 命令部署pod 开发测试 使用 Harbor 作为镜像仓库 部署Harbor作为镜像仓库 部署方式: 采用方式docker-compose部署docker容器
下载地址: https://github.com/goharbor/harbor/releases/tag/v1.10.12
1
2
3
4
wget https://github.com/goharbor/harbor/releases/download/v1.10.12/harbor-offline-installer-v1.10.12.tgz tar -zxf harbor-offline-installer-v1.10.12.tgz -C /opt/ mv /opt/harbor /opt/harbor-v1.10.12 ln -s /opt/harbor-v1.10.12 /opt/harbor
编辑harbor配置文件 1 2 3 4 5 6 7 8 9 10 11 12 13 14 15 16 17 18 19 [root@gitlab harbor]# cat harbor.yml # Configuration file of Harbor # The IP address or hostname to access admin UI and registry service. # DO NOT use localhost or 127.0.0.1, because Harbor needs to be accessed by external clients. hostname: harbor.od.com # http related config http: # port for http, default is 80. If https enabled, this port will redirect to https port port: 180 # https related config # https: # https port for harbor, default is 443 # port: 443 # The path of cert and key files for nginx # certificate: /your/certificate/path # private_key: /your/private/key/path
安装启动 1 2 3 4 5 # yum install docker-compose -y # harbor]# ./install.sh --with-chartmuseum harbor]# docker-compose ps
注: 在部署harbor 厂库的时候,记得启用Harbor的Chart仓库服务(--with-chartmuseum),Helm 可以把打包好的chart 放入到harbor 中。
使用 Gitlab 作为代码仓库(弃用) 部署方式1:
我是采用二进制包安装部署定制,测试环境2G1核,关闭了很多不必要服务。
1 2 3 4 mkdir -p /server/tools cd /server/tools wget https://mirrors.tuna.tsinghua.edu.cn/gitlab-ce/yum/el7/gitlab-ce-12.3.5-ce.0.el7.x86_64.rpm yum localinstall gitlab-ce-12.3.5-ce.0.el7.x86_64.rpm
部署方式2:
官网上docker 的部署gitlab-ce的方式
1 2 3 4 5 6 7 8 9 10 11 12 mkdir /opt/gitlab export GITLAB_HOME=/opt/gitlab docker run --detach --publish 443:443 --publish 80:80 --publish 2222:22 --name gitlab --restart always --volume $GITLAB_HOME/config:/etc/gitlab --volume $GITLAB_HOME/logs:/var/log/gitlab --volume $GITLAB_HOME/data:/var/opt/gitlab gitlab/gitlab-ce:latest
在 Kubernetes 中部署 Jenkins
准备资源配置清单 RABC Deployment Service Ingress 1 2 3 4 5 6 7 8 9 10 11 12 13 14 15 16 17 18 19 20 21 22 23 24 25 26 27 28 29 30 31 32 33 34 35 36 37 38 39 40 41 42 mkdir -p k8s-yaml/jenkins/ cat > k8s-yaml/jenkins/rbac.yaml <<EOF --- apiVersion: v1 kind: ServiceAccount metadata: name: jenkins namespace: infra --- kind: ClusterRole apiVersion: rbac.authorization.k8s.io/v1 metadata: name: jenkins rules: - apiGroups: ["" ] resources: ["pods" ] verbs: ["create" ,"delete" ,"get" ,"list" ,"patch" ,"update" ,"watch" ] - apiGroups: ["" ] resources: ["pods/exec" ] verbs: ["create" ,"delete" ,"get" ,"list" ,"patch" ,"update" ,"watch" ] - apiGroups: ["" ] resources: ["pods/log" ] verbs: ["get" ,"list" ,"watch" ] - apiGroups: ["" ] resources: ["secrets" ] verbs: ["get" ] --- apiVersion: rbac.authorization.k8s.io/v1 kind: ClusterRoleBinding metadata: name: jenkins roleRef: apiGroup: rbac.authorization.k8s.io kind: ClusterRole name: jenkins subjects: - kind: ServiceAccount name: jenkins namespace: infra EOF
1 2 3 4 5 6 7 8 9 10 11 12 13 14 15 16 17 18 19 20 21 22 23 24 25 26 27 28 29 30 31 32 33 34 35 36 37 38 39 40 41 42 43 44 45 46 47 48 49 50 51 52 53 54 55 56 57 58 59 60 61 62 63 64 65 66 cat > k8s-yaml/jenkins/deployment.yaml <<EOF kind: Deployment apiVersion: apps/v1 metadata: name: jenkins namespace: infra labels: name: jenkins spec: replicas: 1 selector: matchLabels: name: jenkins template: metadata: labels: app: jenkins name: jenkins spec: serviceAccountName: jenkins nodeSelector: jenkins: "true" volumes: - name: data hostPath: path: /data/jenkins_home type: Directory containers: - name: jenkins image: jenkins/jenkins:latest-jdk8 ports: - name: http containerPort: 8080 protocol: TCP - name: slavelistener containerPort: 50000 protocol: TCP env: - name: JAVA_OPTS value: "-Xmx512m -Xms512m -Duser.timezone=Asia/Shanghai -Dhudson.slaves.NodeProvisioner.initialDelay=0 -Dhudson.slaves.NodeProvisioner.MARGIN=50 -Dhudson.slaves.NodeProvisioner.MARGIN0=0.85" resources: limits: cpu: 500m memory: 1Gi requests: cpu: 500m memory: 1Gi volumeMounts: - name: data mountPath: /var/jenkins_home terminationMessagePath: /dev/termination-log terminationMessagePolicy: File imagePullPolicy: IfNotPresent restartPolicy: Always terminationGracePeriodSeconds: 30 securityContext: runAsUser: 0 schedulerName: default-scheduler strategy: type: RollingUpdate rollingUpdate: maxUnavailable: 1 maxSurge: 1 revisionHistoryLimit: 7 progressDeadlineSeconds: 600 EOF
1 2 3 4 5 6 7 8 9 10 11 12 13 14 15 16 17 18 19 20 21 cat > k8s-yaml/jenkins/svc.yaml <<EOF kind: Service apiVersion: v1 metadata: name: jenkins namespace: infra spec: ports: - protocol: TCP port: 80 targetPort: 8080 name: web - protocol: TCP port: 50000 targetPort: 50000 name: slave selector: app: jenkins type: ClusterIP sessionAffinity: None EOF
1 2 3 4 5 6 7 8 9 10 11 12 13 14 15 16 17 18 19 cat > k8s-yaml/jenkins/ingerss.yaml <<EOF apiVersion: networking.k8s.io/v1 kind: Ingress metadata: name: jenkins-ui namespace: infra spec: rules: - host: jenkins.od.com http: paths: - pathType: Prefix path: / backend: service: name: jenkins port: number: 80 EOF
应用资源配置清单 1 2 3 4 5 6 7 # 创建Jenkins标签 kubectl label nodes k8s-node1 jenkins=true # 应用配置清单 kubectl apply -f rbac.yaml kubectl apply -f deployment.yaml kubectl apply -f svc.yaml kubectl apply -f ingress.yaml
访问jenkins控制台,初始化环境 访问地址:http://jenkins.od.com
第一次部署会进行初始化:
查看密码,可以去查看jenkins 的启动日志
1 kubectl logs -n infra jenkins-9766b68cb-884lb
部署插件这块,选择插件来安装
点击“无”,不安装任何插件
安装插件 默认从国外网络下载插件,会比较慢,建议修改成国内源:
只需要到k8s-node1上,修改挂载的内容即可
1 2 3 4 5 6 7 8 # 进入到挂载目录 cd /data/jenkins_home/updates/ # 修改插件的下载地址为清华源的地址 sed -i 's#https://updates.jenkins.io/download#https://mirrors.tuna.tsinghua.edu.cn/jenkins#g' default.json # 修改jenkins启动时检测的URL网址,改为国内baidu的地址 sed -i 's#http://www.google.com#https://www.baidu.com#g' default.json
删除pod重建即可!(pod名称改成你实际的)
输入账户密码从新登陆jenkins控制台
依次点击 管理Jenkins(Manage Jenkins)->系统配置(System Configuration)–>管理插件(Manage Pluglns)
分别搜索 Git/Git Parameter/Pipeline/kubernetes/Config File Provider,选中点击安装。
安装插件可能会失败,多试几次就好了,安装完记得重启Pod
插件名称 用途 Git 用于拉取代码 Git Parameter 用于Git参数化构建 Pipeline 用于流水线 kubernetes 用于连接Kubernetes动态创建Slave代理 Config File Provider 用于存储kubectl用于连接k8s集群的kubeconfig配置文件
Jenkins在K8S中动态创建代理 Jenkins构建项目时,并行构建,如果多个部门同时构建就会有等待。所以这里采用master/slave架构
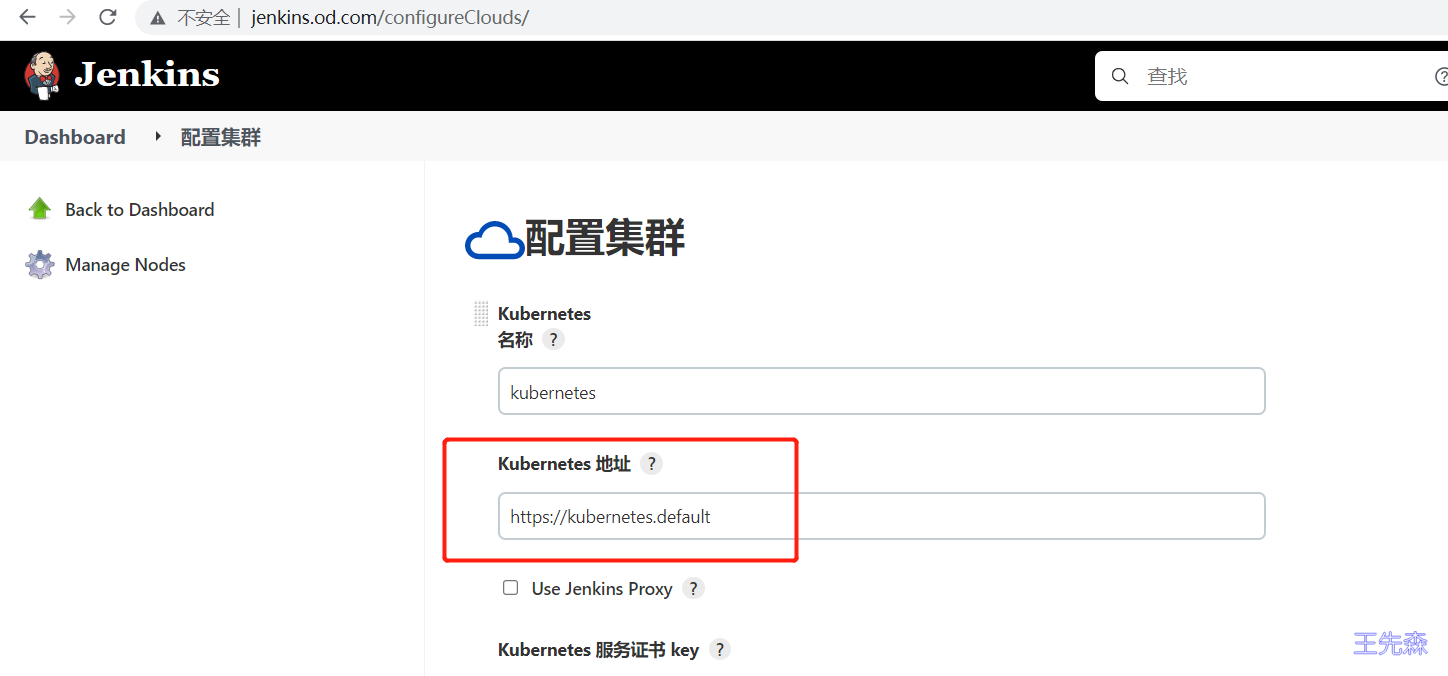
在jenkins中添加kubernetes云 管理Jenkins->Manage Nodes and Clouds->configureClouds->Add
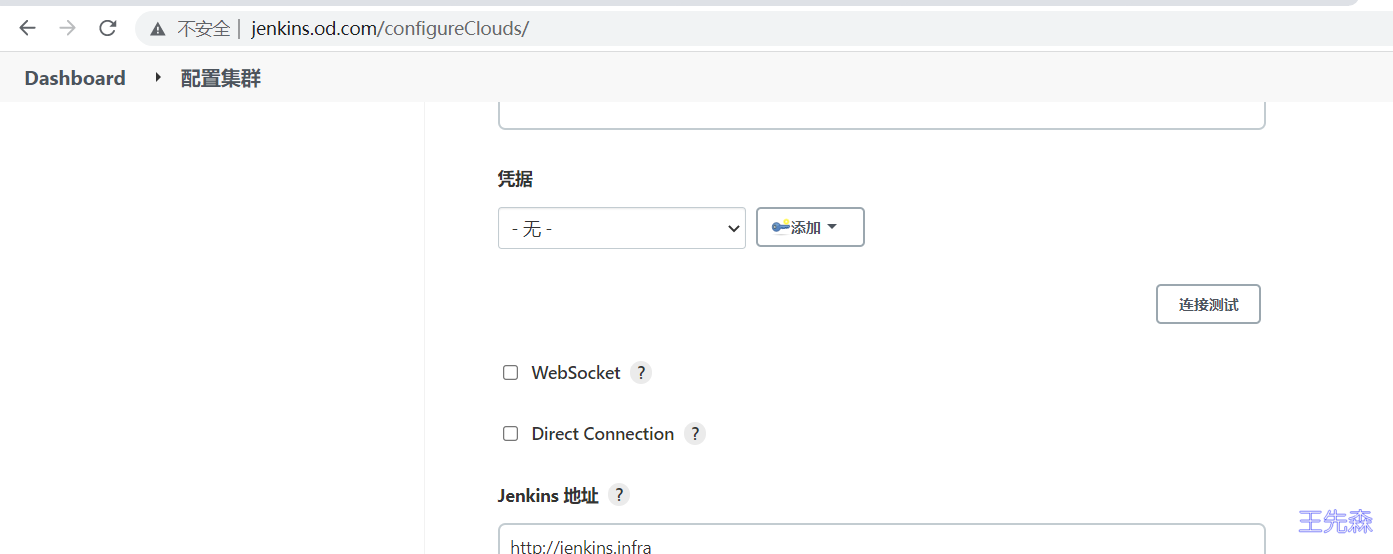
输入Kubernetes 地址: https://kubernetes.default ,点击连接测试,测试通过的话,会显示k8s的版本信息
输入Jenkins 地址: http://jenkins.infra
构建Jenkins-Slave镜像 jenkins 官方有jenkins-slave 制作好的镜像,可以直接 docker pull jenkins/jnlp-slave 下载到本地并上传本地私有镜像厂库。官方的镜像好处就是不需要再单独安装maven,kubectl 这样的命令了,可以直接使用。
构建镜像所需要的文件:
Dockerfile:构建镜像文件 jenkins-slave:shell脚本,用于启动slave.jar settings.xml: 修改maven官方源为阿里云源 slave.jar:agent程序,接受master下发的任务(slave.jar jar 包文件 可以在jenkins 添加slave-node 节点,获取到 jar 包文件获取办法创建新的代理选择启动方式为通过Java Web启动代理) helm:用于创建k8s应用模板 这里主要看下 Dockerfile 文件的内容:
1 2 3 4 5 6 7 8 9 10 11 12 13 14 15 16 17 18 cat Dockerfile << EOF FROM maven:3.8 .6 -openjdk-8 -slimLABEL www.boysec.cn wangxiansen RUN set -eux; apt update -y && apt install -y curl git && \ apt clean all && \ rm -rf /var/cache/apt/* && \mkdir -p /usr/share/jenkinsRUN /bin/cp /usr/share/zoneinfo/Asia/Shanghai /etc/localtime &&\ echo 'Asia/Shanghai' >/etc/timezone COPY agent.jar /usr/share/jenkins/slave.jar COPY settings.xml /usr/share/maven/conf/settings.xml COPY jenkins-slave /usr/bin/jenkins-slave COPY docker /usr/bin/docker COPY kubectl /usr/bin/kubectl COPY helm /usr/bin/helm RUN chmod +x /usr/bin/jenkins-slave /usr/bin/docker /usr/bin/helm /usr/bin/kubectl ENTRYPOINT ["jenkins-slave" ] EOF
jenkins-slave脚本内容
1 2 3 4 5 6 7 8 9 10 11 12 13 14 15 16 17 18 19 20 21 22 23 24 25 26 27 28 29 30 31 32 33 34 35 36 37 38 39 40 41 42 43 44 45 46 47 48 49 50 51 52 53 54 55 56 57 58 59 60 61 62 63 64 65 66 67 68 69 70 71 72 73 74 75 76 77 78 79 80 81 82 83 84 85 86 87 88 89 90 91 92 93 94 95 96 97 98 99 100 101 102 103 104 105 106 107 108 109 110 111 112 113 114 115 116 117 118 119 120 121 122 123 124 125 126 127 128 129 130 131 132 133 # !/usr/bin/env sh # The MIT License # # # of this software and associated documentation files (the "Software" ), to deal # in the Software without restriction, including without limitation the rights # to use, copy, modify, merge, publish, distribute, sublicense, and/or sell # copies of the Software, and to permit persons to whom the Software is # furnished to do so, subject to the following conditions: # # all copies or substantial portions of the Software. # # IMPLIED, INCLUDING BUT NOT LIMITED TO THE WARRANTIES OF MERCHANTABILITY, # FITNESS FOR A PARTICULAR PURPOSE AND NONINFRINGEMENT. IN NO EVENT SHALL THE # AUTHORS OR COPYRIGHT HOLDERS BE LIABLE FOR ANY CLAIM, DAMAGES OR OTHER # LIABILITY, WHETHER IN AN ACTION OF CONTRACT, TORT OR OTHERWISE, ARISING FROM, # OUT OF OR IN CONNECTION WITH THE SOFTWARE OR THE USE OR OTHER DEALINGS IN # THE SOFTWARE. # Usage jenkins-agent.sh [options] -url http://jenkins [SECRET] [AGENT_NAME] # Optional environment variables : # * JENKINS_JAVA_BIN : Java executable to use instead of the default in PATH or obtained from JAVA_HOME # * JENKINS_JAVA_OPTS : Java Options to use for the remoting process, otherwise obtained from JAVA_OPTS # * JENKINS_TUNNEL : HOST:PORT for a tunnel to route TCP traffic to jenkins host, when jenkins can't be directly accessed over network # * JENKINS_URL : alternate jenkins URL # * JENKINS_SECRET : agent secret, if not set as an argument # * JENKINS_AGENT_NAME : agent name, if not set as an argument # * JENKINS_AGENT_WORKDIR : agent work directory, if not set by optional parameter -workDir # * JENKINS_WEB_SOCKET: true if the connection should be made via WebSocket rather than TCP # * JENKINS_DIRECT_CONNECTION: Connect directly to this TCP agent port, skipping the HTTP(S) connection parameter download. # Value: "<HOST>:<PORT>" # * JENKINS_INSTANCE_IDENTITY: The base64 encoded InstanceIdentity byte array of the Jenkins master. When this is set, # the agent skips connecting to an HTTP(S) port for connection info. # * JENKINS_PROTOCOLS: Specify the remoting protocols to attempt when instanceIdentity is provided. if [ $# -eq 1 ] && [ "${1#-}" = "$1" ] ; then # if `docker run` only has one arguments and it is not an option as `-help`, we assume user is running alternate command like `bash` to inspect the image exec "$@" else # if -tunnel is not provided, try env vars case "$@" in *"-tunnel "*) ;; *) if [ ! -z "$JENKINS_TUNNEL" ]; then TUNNEL="-tunnel $JENKINS_TUNNEL" fi ;; esac # if -workDir is not provided, try env vars if [ ! -z "$JENKINS_AGENT_WORKDIR" ]; then case "$@" in *"-workDir"*) echo "Warning: Work directory is defined twice in command-line arguments and the environment variable" ;; *) WORKDIR="-workDir $JENKINS_AGENT_WORKDIR" ;; esac fi if [ -n "$JENKINS_URL" ]; then URL="-url $JENKINS_URL" fi if [ -n "$JENKINS_NAME" ]; then JENKINS_AGENT_NAME="$JENKINS_NAME" fi if [ "$JENKINS_WEB_SOCKET" = true ]; then WEB_SOCKET=-webSocket fi if [ -n "$JENKINS_PROTOCOLS" ]; then PROTOCOLS="-protocols $JENKINS_PROTOCOLS" fi if [ -n "$JENKINS_DIRECT_CONNECTION" ]; then DIRECT="-direct $JENKINS_DIRECT_CONNECTION" fi if [ -n "$JENKINS_INSTANCE_IDENTITY" ]; then INSTANCE_IDENTITY="-instanceIdentity $JENKINS_INSTANCE_IDENTITY" fi if [ "$JENKINS_JAVA_BIN" ]; then JAVA_BIN="$JENKINS_JAVA_BIN" else # if java home is defined, use it JAVA_BIN="java" if [ "$JAVA_HOME" ]; then JAVA_BIN="$JAVA_HOME/bin/java" fi fi if [ "$JENKINS_JAVA_OPTS" ]; then JAVA_OPTIONS="$JENKINS_JAVA_OPTS" else # if JAVA_OPTS is defined, use it if [ "$JAVA_OPTS" ]; then JAVA_OPTIONS="$JAVA_OPTS" fi fi # if both required options are defined, do not pass the parameters OPT_JENKINS_SECRET="" if [ -n "$JENKINS_SECRET" ]; then case "$@" in *"${JENKINS_SECRET}"*) echo "Warning: SECRET is defined twice in command-line arguments and the environment variable" ;; *) OPT_JENKINS_SECRET="${JENKINS_SECRET}" ;; esac fi OPT_JENKINS_AGENT_NAME="" if [ -n "$JENKINS_AGENT_NAME" ]; then case "$@" in *"${JENKINS_AGENT_NAME}"*) echo "Warning: AGENT_NAME is defined twice in command-line arguments and the environment variable" ;; *) OPT_JENKINS_AGENT_NAME="${JENKINS_AGENT_NAME}" ;; esac fi #TODO: Handle the case when the command-line and Environment variable contain different values. #It is fine it blows up for now since it should lead to an error anyway. exec $JAVA_BIN $JAVA_OPTIONS -cp /usr/share/jenkins/slave.jar hudson.remoting.jnlp.Main -headless $TUNNEL $URL $WORKDIR $WEB_SOCKET $DIRECT $PROTOCOLS $INSTANCE_IDENTITY $OPT_JENKINS_SECRET $OPT_JENKINS_AGENT_NAME "$@" fi
构建镜像 使用 docker build 构建镜像,并上传至镜像仓库(需要提前创建base仓库存储 )
1 2 3 4 5 6 7 8 # docker build 构建镜像 docker build . -t harbor.od.com/base/jenkins-slave:mvn-slim # 登录Harbor仓库 docker login harbor.od.com # 上传到Harbor仓库 docker pull harbor.od.com/base/jenkins-slave:mvn-slim
登陆harbor 仓库 WEB控制台,可以看到已经上传上来的镜像
测试jenkins-slave 在jenkins 中创建一个流水线项目,测试jenkins-slave是否正常。
在pipeline 中 编写脚本,pipeline 脚本分为 声明式 和 脚本式
我这里写 声明式 脚本
需要注意的是,spec 中定义containers的名字一定要写jnlp
1 2 3 4 5 6 7 8 9 10 11 12 13 14 15 16 17 18 19 20 21 22 23 24 pipeline { agent { kubernetes { label "jenkins-slave" yaml """ apiVersion: v1 kind: Pod metadata: name: jenkins-slave spec: containers: - name: jnlp image: harbor.od.com/base/jenkins-slave:mvn-slim """ } } stages { stage('测试') { steps { sh 'hostname' } } } }
点击Build New 按钮,开始构建
构建结束后,点击项目编号,可以查看jenkins 构建的日志
日志中可以看到 输出了主机名
同时在构建的时候,K8S 集群中的infra命名空间下,临时起了一个pod,这个Pod就是 jenkins 动态创建的代理,用于执行jenkins master 下发的任务
当jenkins 构建的任务完成后,这个pod会自动销毁
1 2 3 4 5 6 7 8 # kubectl get pods -n infra NAMESPACE NAME READY STATUS RESTARTS AGE infra jenkins-9766b68cb-884lb 1/1 Running 0 24d infra jenkins-slave-n5c3l-9p69s 1/1 Running 0 19s # kubectl get pods -n infra NAME READY STATUS RESTARTS AGE jenkins-9766b68cb-884lb 1/1 Running 0 24d
准备共享存储 因为每次maven打包会产生依赖的库文件,为了加快每次编译打包的速度,我们可以创建一个NFS 用来存储maven 每次打包产生的依赖文件。以及 我们需要将 k8s 集群 node 主机上的docker 命令挂载到Pod 中,用于镜像的打包 ,推送。
运维主机,以及所有运算节点上:
1 # yum install nfs-utils -y
配置NFS服务 1 2 3 cat > /etc/exports <<EOF /data/nfs-volume 10.1.1.0/24(rw,no_root_squash) EOF
启动NFS服务 1 2 3 4 5 mkdir -p /data/nfs-volume/m2 systemctl start rpcbind systemctl enable rpcbind systemctl start nfs systemctl enable nfs
Jenkins-Slave资源配置清单 1 2 3 4 5 6 7 8 9 10 11 12 13 14 15 16 17 18 19 20 21 apiVersion: v1 kind: Pod metadata: name: jenkins-slave spec: containers: - name: jnlp image: harbor.od.com/base/jenkins-slave:mvn-slim volumeMounts: - name: docker-sock mountPath: /var/run/docker.sock - name: maven-cache mountPath: /root/.m2 volumes: - name: docker-sock hostPath: path: /var/run/docker.sock - name: maven-cache nfs: server: 10.1.1.150 path: /data/nfs-volume/m2
此处不需要应用!!
Jenkins在Kubernetes中持续部署dubbo微服务 编写helm Charts模板 详细介绍请移步Helm3 使用Harbor仓库存储Chart
创建dubbo chart
创建配置清单模板 Deployment Service Ingress _helpers.tpl NOTES values 1 2 3 4 5 6 7 8 9 10 11 12 13 14 15 16 17 18 19 20 21 22 23 24 25 26 27 28 29 30 31 32 33 34 35 36 37 38 39 40 41 42 43 44 45 46 47 48 49 50 51 52 53 54 55 56 k8s-yaml]# cat > dubbo/templates/deployment.yaml <<EOF apiVersion: apps/v1 kind: Deployment metadata: name: {{ include "dubbo.fullname" . }} labels: {{- include "dubbo.labels" . | nindent 4 }} spec: replicas: {{ .Values.replicaCount }} selector: matchLabels: {{- include "dubbo.selectorLabels" . | nindent 6 }} template: metadata: {{- with .Values.podAnnotations }} annotations: {{- toYaml . | nindent 8 }} {{- end }} labels: {{- include "dubbo.selectorLabels" . | nindent 8 }} spec: {{- with .Values.imagePullSecrets }} imagePullSecrets: {{- toYaml . | nindent 8 }} {{- end }} containers: - name: {{ .Chart.Name }} image: "{{ .Values.image.repository }} :{{ .Values.image.tag }} " imagePullPolicy: {{ .Values.image.pullPolicy }} env: {{- range $k , $v := .Values.env }} - name: {{ $k }} value: {{ $v | quote }} {{- end }} ports: - name: http containerPort: {{ .Values.service.targetPort }} protocol: TCP - name: zk containerPort: 20880 protocol: TCP resources: {{- toYaml .Values.resources | nindent 12 }} {{- with .Values.nodeSelector }} nodeSelector: {{- toYaml . | nindent 8 }} {{- end }} {{- with .Values.affinity }} affinity: {{- toYaml . | nindent 8 }} {{- end }} {{- with .Values.tolerations }} tolerations: {{- toYaml . | nindent 8 }} {{- end }} EOF
1 2 3 4 5 6 7 8 9 10 11 12 13 14 15 16 17 cat > dubbo/templates/service.yaml <<EOF apiVersion: v1 kind: Service metadata: name: {{ include "dubbo.fullname" . }} labels: {{- include "dubbo.labels" . | nindent 4 }} spec: type: {{ .Values.service.type }} ports: - port: {{ .Values.service.port }} targetPort: http protocol: TCP name: http selector: {{- include "dubbo.selectorLabels" . | nindent 4 }} EOF
1 2 3 4 5 6 7 8 9 10 11 12 13 14 15 16 17 18 19 20 21 22 23 24 25 26 cat > dubbo/templates/ingress.yaml <<EOF {{- if .Values.ingress.enabled - }} apiVersion: networking.k8s.io/v1 kind: Ingress metadata: name: {{ include "dubbo.fullname" . }} labels: {{- include "dubbo.labels" . | nindent 4 }} {{- with .Values.ingress.annotations }} annotations: {{- toYaml . | nindent 4 }} {{- end }} spec: rules: - host: {{ .Values.ingress.host }} http: paths: - pathType: Prefix path: / backend: service: name: {{ include "dubbo.fullname" . }} port: number: {{ .Values.service.port }} {{- end }} EOF
1 2 3 4 5 6 7 8 9 10 11 12 13 14 15 16 17 18 19 20 21 22 23 24 25 26 cat > dubbo/templates/_helpers.tpl <<EOF {{/* 资源名称 Chart表示Chart.yaml中定义内容 */}} {{- define "dubbo.fullname" -}} {{- .Chart.Name -}}-{{ .Release.Name }} {{- end -}} {{/* 资源标签 */}} {{- define "dubbo.labels" -}} app: {{ template "dubbo.fullname" . }} chart: "{{ .Chart.Name }}-{{ .Chart.Version }}" release: "{{ .Release.Name }}" {{- end -}} {{/* Pod标签选择器 */}} {{- define "dubbo.selectorLabels" -}} app: {{ template "dubbo.fullname" . }} release: "{{ .Release.Name }}" {{- end -}} EOF
1 2 3 4 5 6 7 8 9 10 11 cat > dubbo/templates/NOTES.txt <<EOF web-hostname: {{- if .Values.ingress.enabled }} http{{ if $.Values.ingress.tls }}s{{ end }}://{{ .Values.ingress.host }} {{- end }} {{- if contains "NodePort" .Values.service.type }} export NODE_PORT=$(kubectl get --namespace {{ .Release.Namespace }} -o jsonpath="{.spec.ports[0].nodePort}" services {{ include "dubbo.fullname" . }}) export NODE_IP=$(kubectl get nodes --namespace {{ .Release.Namespace }} -o jsonpath="{.items[0].status.addresses[0].address}") echo http://$NODE_IP:$NODE_PORT {{- end }} EOF
1 2 3 4 5 6 7 8 9 10 11 12 13 14 15 16 17 18 19 20 21 22 23 24 25 26 27 28 29 30 31 32 33 34 35 36 37 38 39 cat > dubbo/values.yaml <<EOF env: JAR_BALL: dubbo-server.jar replicaCount: 1 image: repository: nginx pullPolicy: IfNotPresent tag: "" resources: limits: cpu: 500m memory: 512Mi requests: cpu: 100m memory: 128Mi imagePullSecrets: []service: type: ClusterIP port: 8080 targetPort: 8080 ingress: enabled: false className: "" annotations: kubernetes.io/ingress.class: traefik hosts: - host: example.od.com paths: - path: / pathType: ImplementationSpecific tolerations: []EOF
上传harbor仓库中 1 2 helm package dubbo/ helm cm-push dubbo-0.1.0.tgz --username=admin --password=Harbor12345 http://harbor.od.com//chartrepo/app
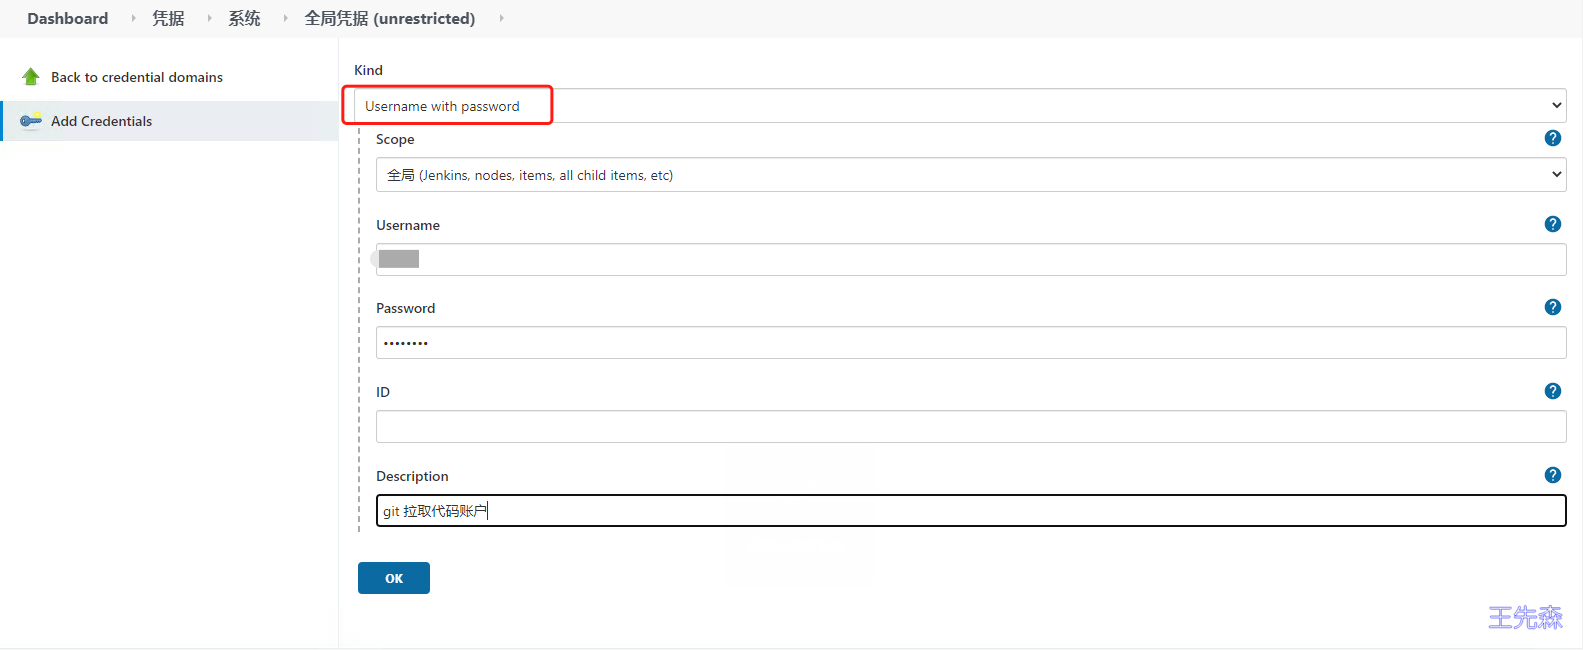
配置Jenkins流水线 创建凭证 登陆jenkins 控制器,使用凭据的方式保存 git 账户信息 和 harbor 账户信息. Manage Jenkins -> Manage Credentials -> 全局凭据 (unrestricted) -> Add Credentials
URL: http://jenkins.od.com/credentials/store/system/domain/_/
选择Kind 类型 为 username with passwd
输入账户名,密码
添加一个描述信息
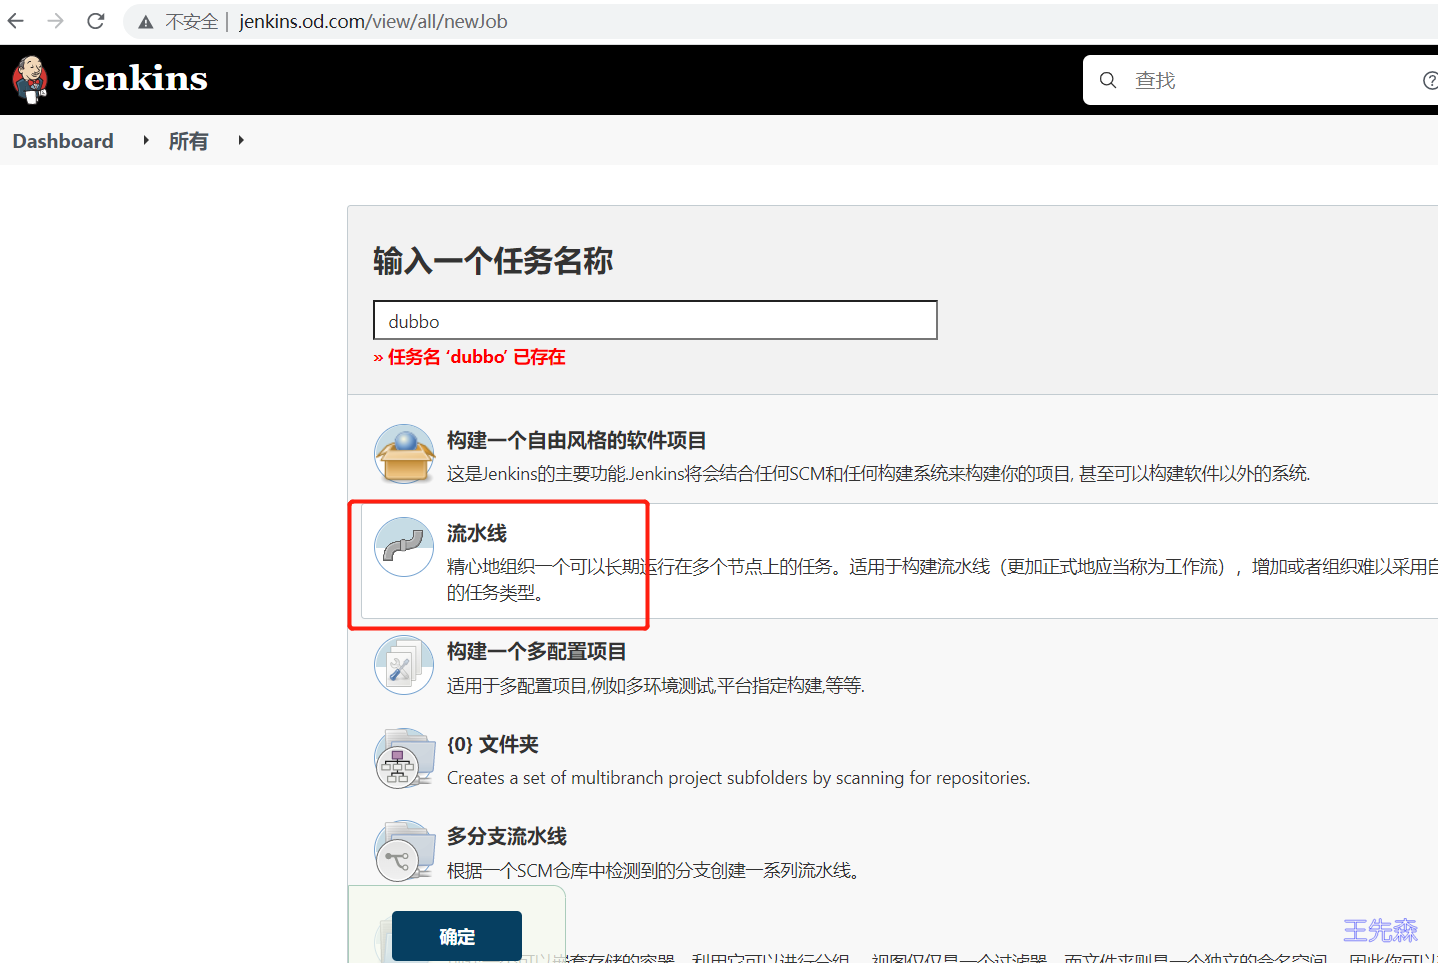
配置New-job
粘贴进流水线脚本中 1 2 3 4 5 6 7 8 9 10 11 12 13 14 15 16 17 18 19 20 21 22 23 24 25 26 27 28 29 30 31 32 33 34 35 36 37 38 39 40 41 42 43 44 45 46 47 48 49 50 51 52 53 54 55 56 57 58 59 60 61 62 63 64 65 66 67 68 69 70 71 72 73 74 75 76 77 78 79 80 81 82 83 84 85 86 87 88 89 90 91 92 93 94 95 96 97 98 99 100 101 102 103 104 105 106 107 108 109 110 111 112 # !/usr/bin/env groovy def registry = "harbor.od.com" def demo_domain_name = "demo.od.com" // 认证 def image_pull_secret = "registry-pull-secret" def harbor_auth = "0cf68010-c2db-49ed-a616-d39776123c12" def git_auth = "c699f8e9-88cb-4ac6-85fa-ada62eb38918" // ConfigFileProvider ID def k8s_auth = "b9563cf9-7e54-465b-91ca-cceb6e29f770" pipeline { agent { kubernetes { yaml ''' apiVersion: v1 kind: Pod metadata: name: jenkins-slave spec: containers: - name: jnlp image: harbor.od.com/base/jenkins-slave:mvn-slim volumeMounts: - name: docker-sock mountPath: /var/run/docker.sock - name: maven-cache mountPath: /root/.m2 volumes: - name: docker-sock hostPath: path: /var/run/docker.sock - name: maven-cache nfs: server: 10.1.1.150 path: /data/nfs-volume/m2 ''' } } parameters { //流水线参数化构建相关参数 choice (choices: ['dubbo-demo-service', 'dubbo-demo-web'], description: 'dubbo-demo-service提供者、dubbo-demo-web消费者', name: 'app_name') choice (choices: ['https://gitee.com/dabou/dubbo-demo-service.git', 'https://gitee.com/dabou/dubbo-demo-web.git'], description: '部署提供者还是消费者服务', name: 'git_repo') choice (choices: ['app/dubbo-demo-service', 'app/dubbo-demo-web'], description: '构建的镜像名称', name: 'image_name') choice (choices: ['./dubbo-server/target', './dubbo-client/target'], description: 'dubbo-server:提供者目录、dubbo-client消费者目录', name: 'target_dir') choice (choices: ['base/jre:8u112', 'base/jre:11u112'], description: '选择那个版本底包', name: 'base_image') choice (choices: ['dubbo', 'demo'], description: '部署模板', name: 'Template') choice (choices: ['1', '3', '5', '7'], description: '副本数', name: 'ReplicaCount') choice (choices: ['app'], description: '命名空间', name: 'Namespace') choice (choices: ['upgrade', 'install'], description: '更新部署还是新部署', name: 'Helm_Pod_status') string(defaultValue: 'master', description: '项目在git中央仓库种对应的版本号或分支', name: 'git_ver', trim: true) string(defaultValue: 'mvn clean package -Dmaven.test.skip=true', description: '编译命令 例: mvn clean package -e -q -Dmaven.test.skip=true', name: 'mvn_cmd') } stages { stage('拉取代码') { //get project code from repo steps { sh "git clone ${params.git_repo} ${params.app_name}/${env.BUILD_NUMBER} && cd ${params.app_name}/${env.BUILD_NUMBER} && git checkout ${params.git_ver}" } } stage('代码编译') { //exec mvn cmd steps { sh "cd ${params.app_name}/${env.BUILD_NUMBER} && ${params.mvn_cmd}" } } stage('移动文件') { //move jar file into project_dir steps { sh "cd ${params.app_name}/${env.BUILD_NUMBER} && cd ${params.target_dir} && mkdir project_dir && mv *.jar ./project_dir" } } stage('构建镜像') { //build image and push to registry steps { withCredentials([usernamePassword(credentialsId: "${harbor_auth}", passwordVariable: 'password', usernameVariable: 'username')]){ sh "docker login -u ${username} -p '${password}' ${registry}" writeFile file: "${params.app_name}/${env.BUILD_NUMBER}/Dockerfile", text: """FROM harbor.od.com/${params.base_image} ADD ${params.target_dir}/project_dir /opt/project_dir""" sh "cd ${params.app_name}/${env.BUILD_NUMBER} && docker build -t harbor.od.com/${params.image_name}:${params.git_ver}_${BUILD_NUMBER} . && docker push harbor.od.com/${params.image_name}:${params.git_ver}_${BUILD_NUMBER}" configFileProvider([configFile(fileId: "${k8s_auth}", targetLocation: "admin.kubeconfig")]){ sh """ # 添加镜像拉取认证 kubectl create secret docker-registry \${image_pull_secret} --docker-username=\${username} --docker-password=\${password} --docker-server=${registry} -n ${Namespace} --kubeconfig admin.kubeconfig |true # 添加私有chart仓库 helm repo add --username ${username} --password ${password} myrepo http://${registry}/chartrepo/app """ } } } } stage('Helm部署到K8S') { steps { sh """#!/bin/bash common_args="-n ${Namespace} --kubeconfig admin.kubeconfig" service_name=${params.app_name} image=${registry}/app/\${service_name} tag=${params.git_ver}_${BUILD_NUMBER} helm_args="\${service_name} --set image.repository=\${image} --set image.tag=\${tag} --set replicaCount=${replicaCount} --set imagePullSecrets[0].name=${image_pull_secret} myrepo/${Template}" # 针对服务启用ingress if [[ "\${service_name}" == *web* ]]; then helm ${Helm_Pod_status} \${helm_args} \\ --set ingress.enabled=true \\ --set env.JAR_BALL=dubbo-client.jar \\ --set ingress.host=${demo_domain_name} \\ \${common_args} else helm ${Helm_Pod_status} \${helm_args} \${common_args} fi # 查看Pod状态 sleep 10 kubectl get pods \${common_args} """ } } } }
注意: 保存并进行第一次参数化构建后才会出现标签选择,所以第一次构建肯定是失败的。
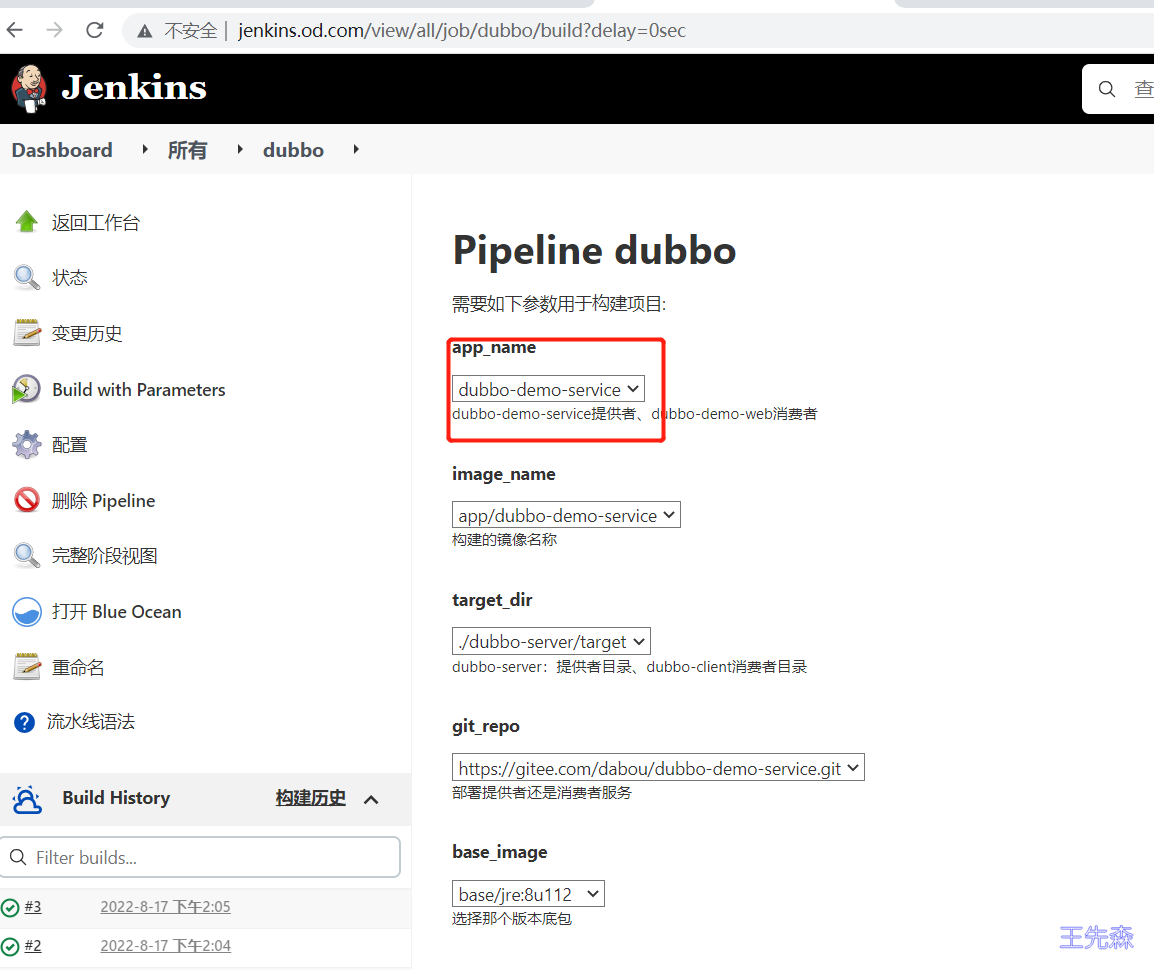
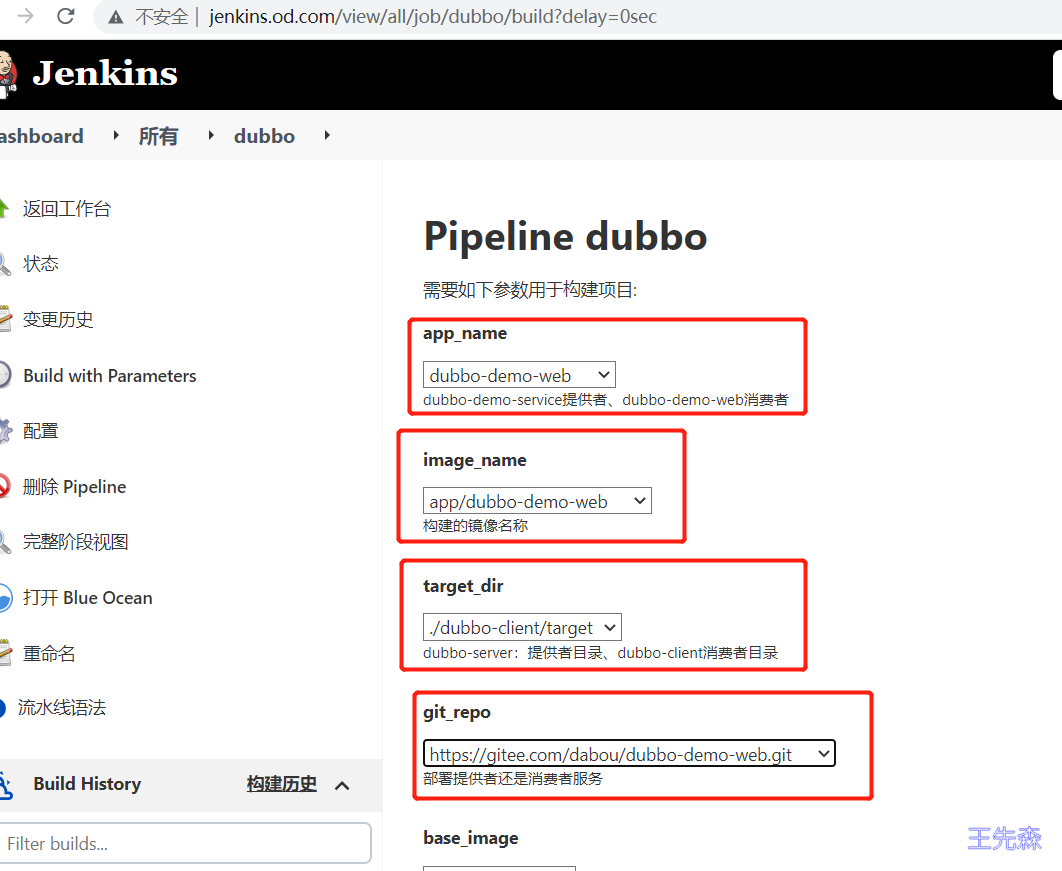
构建注意事项 第二次部署时就出现流水线参数:dubbo-demo-service表示为提供者服务 、dubbo-demo-web表示为消费者服务 进行选择时不要选择错误。默认是提供者服务
dubbo-demo-service部署
注意: 如果是第一次构建Helm_Pod_status必须选择为install ,之后发布默认即可。
dubbo-demo-web(别选错)
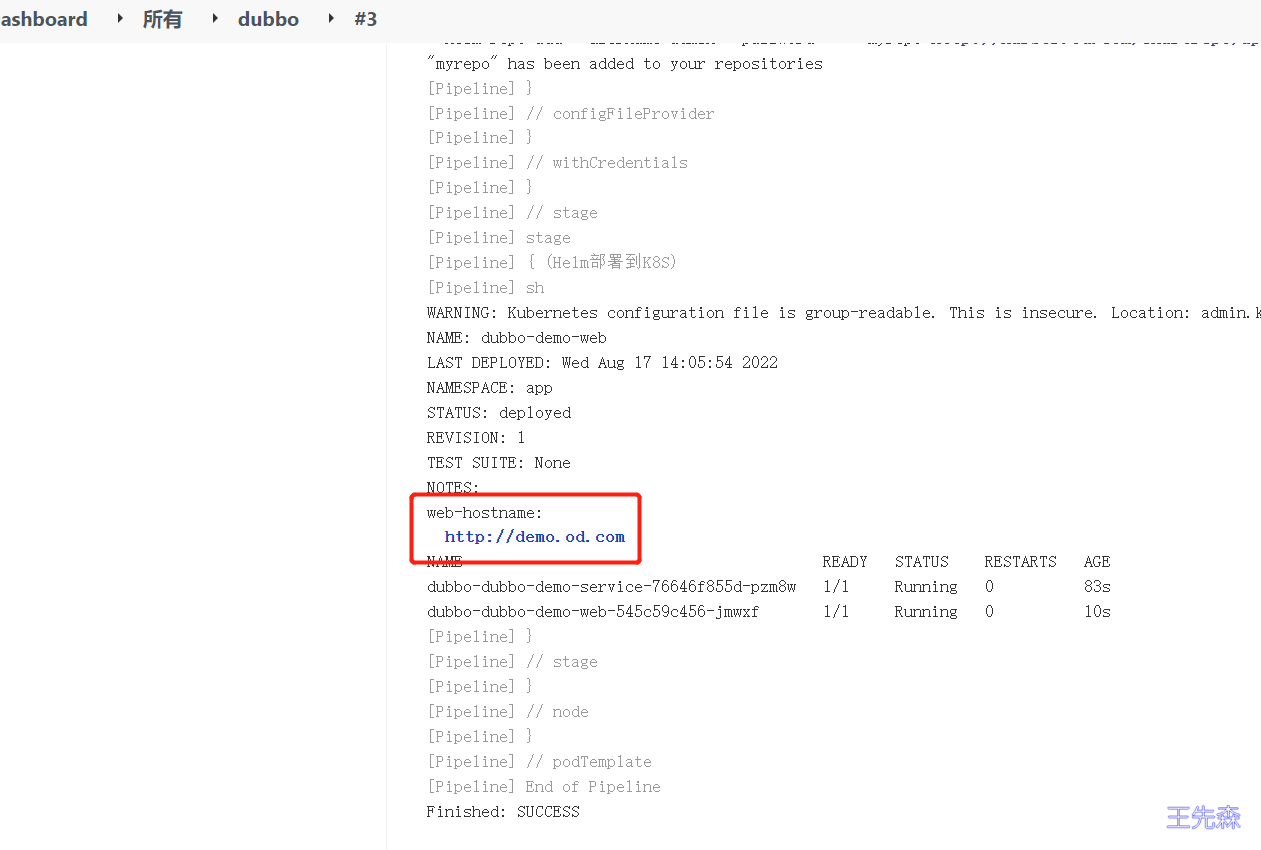
配置dns服务绑定域名IP即可实现访问

