Skywalking监控k8s集群资源 目前监控k8s集群指标是SkyWalking v9版本新特性,配置的时候网上一篇文章没有,搞了很久,记录一下,经验之谈就是多番找GitHub中 Issues 和阅读官方文档。
官方文档解释监控k8s集群地址: https://skywalking.apache.org/docs/main/next/en/setup/backend/backend-k8s-monitoring
安装kube-state-metric 本次安装采用的是 Prometheus Operator 中部署的kube-state-metric ,如果你想只想安装 kube-state-metric 请关注公众号回复:kube-state-metric 获取yaml。
1
2
3
4
5
6
7
8
9
10
11
12
13
# 验证 Prometheus Operator 安装的需要通过https请求访问 $ kubectl describe secrets -n monitoring prometheus-k8s-token-j5spg $ curl -k -H "Authorization: Bearer xxxxxxx" https://172.17.130.5:9443/metrics # HELP go_gc_duration_seconds A summary of the pause duration of garbage collection cycles. # TYPE go_gc_duration_seconds summary go_gc_duration_seconds{quantile="0"} 4.0873e-05 go_gc_duration_seconds{quantile="0.25"} 7.9406e-05 go_gc_duration_seconds{quantile="0.5"} 0.000125605 go_gc_duration_seconds{quantile="0.75"} 0.000348579 go_gc_duration_seconds{quantile="1"} 0.096992811 go_gc_duration_seconds_sum 0.294185344 # 单独安装的验证 # $ curl 172.17.130.5:8080/metrics
cAdvisor 默认情况下,cAdvisor 已集成到 kubelet 中。如果您不知道怎么配置请查看 Prometheus 相关文章进行学习。
安装收集器 OpenTelemetry Collector Opentelemetry-collector 是一个用于收集、处理和传递遥测数据的工具。它是开源的,并且由CNCF(云原生计算基金会)支持。 Opentelemetry-collector 具有以下主要功能和特点:
多种数据源支持:支持从不同的数据源收集数据,包括应用程序、主机和云服务等。它可以收集的数据类型包括实时指标、分布式追踪、日志和异常信息等。 灵活的数据处理:Opentelemetry-collector 允许你对收集的数据进行多种处理。它可以进行数据过滤、数据转换、聚合和丰富等操作,帮助你获得更有用的遥测数据。 数据格式转换:Opentelemetry-collector 支持多种数据格式,包括OpenTelemetry、OpenCensus、Prometheus、Zipkin 和 Jaeger 等。它可以将从不同格式的数据源收集到的数据转换为统一的格式,使其易于处理和分析。 高度可扩展:Opentelemetry-collector 的设计允许用户基于需求进行定制和扩展。你可以选择插件式的架构来实现特定功能的扩展,例如添加自定义收集器、转换器或导出器等。 OpenTelemetry Collector组成 Receiver 是指的接收器,即collector接收的数据源的形式。Receiver可以支持多个数据源,也能支持pull和push两种模式。Processor 是在Receiver和Exportor之间执行的类似于处理数据的插件。Processor可以配置多个并且根据在配置中pipeline的顺序,依次执行。Exportor 是指的导出器,即collector输出的数据源的形式。Exportor可以支持多个数据源,也能支持pull和push两种模式。Extension 是collector的扩展,要注意Extension不处理 otel 的数据,他负责处理的是一些类似健康检查服务发现,压缩算法等等的非 otel 数据的扩展能力。Service 上述的这些配置都是配置的具体数据源或者是插件本身的应用配置,但是实际上的生效与否,使用顺序都是在Service 中配置。主要包含如下几项: extensions pipelines telemetry 编辑资源配置清单 如果您的架构比较庞大也可以参考 OpenTelemetry 官方给出的安装办法:https://raw.githubusercontent.com/open-telemetry/opentelemetry-collector/main/examples/k8s/otel-config.yaml
Skywalking 官网也给出监控k8s集群样例模板:https://raw.githubusercontent.com/apache/skywalking-showcase/main/deploy/platform/kubernetes/templates/feature-kubernetes-monitor/opentelemetry-config.yaml
本次部署仅作为测试环境。
1 2 3 4 5 6 7 8 9 10 11 12 13 14 15 16 17 18 19 20 21 22 23 24 25 26 27 28 29 30 31 32 33 34 35 36 37 38 apiVersion: v1 kind: ServiceAccount metadata: labels: app: skywalking name: otel-collector namespace: skywalking --- kind: ClusterRole apiVersion: rbac.authorization.k8s.io/v1 metadata: name: otel-collector namespace: skywalking labels: app: otel-collector rules: - apiGroups: ["" ] resources: ["pods" , "endpoints" , "services" , "nodes" , "nodes/metrics" ] verbs: ["get" , "watch" , "list" ] - nonResourceURLs: ["/metrics" ] verbs: ["get" ] --- apiVersion: rbac.authorization.k8s.io/v1 kind: ClusterRoleBinding metadata: name: otel-collector namespace: skywalking labels: app: otel-collector roleRef: apiGroup: rbac.authorization.k8s.io kind: ClusterRole name: otel-collector subjects: - kind: ServiceAccount name: otel-collector namespace: skywalking
1 2 3 4 5 6 7 8 9 10 11 12 13 14 15 16 17 18 19 20 21 22 23 24 25 26 27 28 29 30 31 32 33 34 35 36 37 38 39 40 41 42 43 44 45 46 47 48 49 50 51 52 53 54 55 56 57 58 59 60 61 62 63 64 65 66 67 68 69 70 71 72 73 --- apiVersion: v1 kind: ConfigMap metadata: name: otel-collector-conf labels: app: opentelemetry component: otel-collector-conf namespace: skywalking data: otel-collector-config: | receivers: prometheus: config: scrape_configs: - job_name: 'kubernetes-cadvisor' kubernetes_sd_configs: - role: node scheme: https # 通过https访问 metrics_path: /metrics/cadvisor # metrics地址 tls_config: # 证书配置,忽略证书验证。 insecure_skip_verify: true ca_file: /var/run/secrets/kubernetes.io/serviceaccount/ca.crt authorization: # 认证配置 credentials_file: /var/run/secrets/kubernetes.io/serviceaccount/token relabel_configs: - action: labelmap regex: __meta_kubernetes_node_label_(.+) replacement: $$1 - source_labels: [ ] target_label: cluster replacement: k8s-cluster-1.23 ## skywalking仪表盘集群显示的名称,需要修改 # @feature: kubernetes-monitor; configuration to scrape Kubernetes Endpoints metrics - job_name: kube-state-metrics scheme: https metrics_path: /metrics tls_config: insecure_skip_verify: true ca_file: /var/run/secrets/kubernetes.io/serviceaccount/ca.crt authorization: credentials_file: /var/run/secrets/kubernetes.io/serviceaccount/token kubernetes_sd_configs: - role: endpoints relabel_configs: - source_labels: [ __meta_kubernetes_service_label_app_kubernetes_io_name ] regex: kube-state-metrics replacement: $$1 action: keep - action: labelmap regex: __meta_kubernetes_service_label_(.+) - source_labels: [ ] target_label: cluster replacement: k8s-cluster-1.23 ## skywalking仪表盘集群显示的名称,需要修改 otlp: protocols: grpc: endpoint: ${env:MY_POD_IP}:4317 http: endpoint: ${env:MY_POD_IP}:4318 exporters: otlp: endpoint: "http://oap-svc:11800" # skywalking oap后端地址 oap-svc:11800,需要修改 tls: insecure: true logging: # 日志输出,开启debug调试 loglevel: debug service: # extensions: [memory_ballast] pipelines: metrics: receivers: [prometheus] exporters: [otlp, logging]
1 2 3 4 5 6 7 8 9 10 11 12 13 14 15 16 17 18 19 20 21 22 23 24 25 26 27 28 29 30 31 32 33 34 35 36 37 38 39 40 41 42 43 44 45 46 47 48 49 50 51 52 53 54 55 56 57 58 59 60 61 62 63 64 65 66 67 68 69 70 71 72 --- apiVersion: apps/v1 kind: Deployment metadata: name: otel-collector labels: app: opentelemetry component: otel-collector namespace: skywalking spec: selector: matchLabels: app: opentelemetry component: otel-collector minReadySeconds: 5 progressDeadlineSeconds: 120 replicas: 1 template: metadata: labels: app: opentelemetry component: otel-collector spec: serviceAccountName: otel-collector containers: - command: - "/otelcol" - "--config=/conf/otel-collector-config.yaml" image: otel/opentelemetry-collector:0.92.0 name: otel-collector resources: limits: cpu: 1 memory: 1Gi requests: cpu: 200m memory: 400Mi ports: - containerPort: 55679 - containerPort: 4317 - containerPort: 14250 - containerPort: 14268 - containerPort: 9411 - containerPort: 8888 env: - name: MY_POD_IP valueFrom: fieldRef: apiVersion: v1 fieldPath: status.podIP - name: GOMEMLIMIT value: 1000MiB volumeMounts: - name: otel-collector-config-vol mountPath: /conf volumes: - configMap: name: otel-collector-conf items: - key: otel-collector-config path: otel-collector-config.yaml name: otel-collector-config-vol
应用资源配置清单 1 2 3 kubectl apply -f rbac.yaml kubectl apply -f cm.yaml kubectl apply -f dp.yaml
查看状态
1 2 3 4 5 6 $ kubectl get pods -n skywalking NAME READY STATUS RESTARTS AGE oap-7c9cc4f7bd-rtksc 1/1 Running 0 22s otel-collector-7b66c5664d-kbrpq 1/1 Running 0 22h skywalking-es-init-sx6vh 0/1 Completed 0 22h ui-5445497c77-htwxw 1/1 Running 0 22h
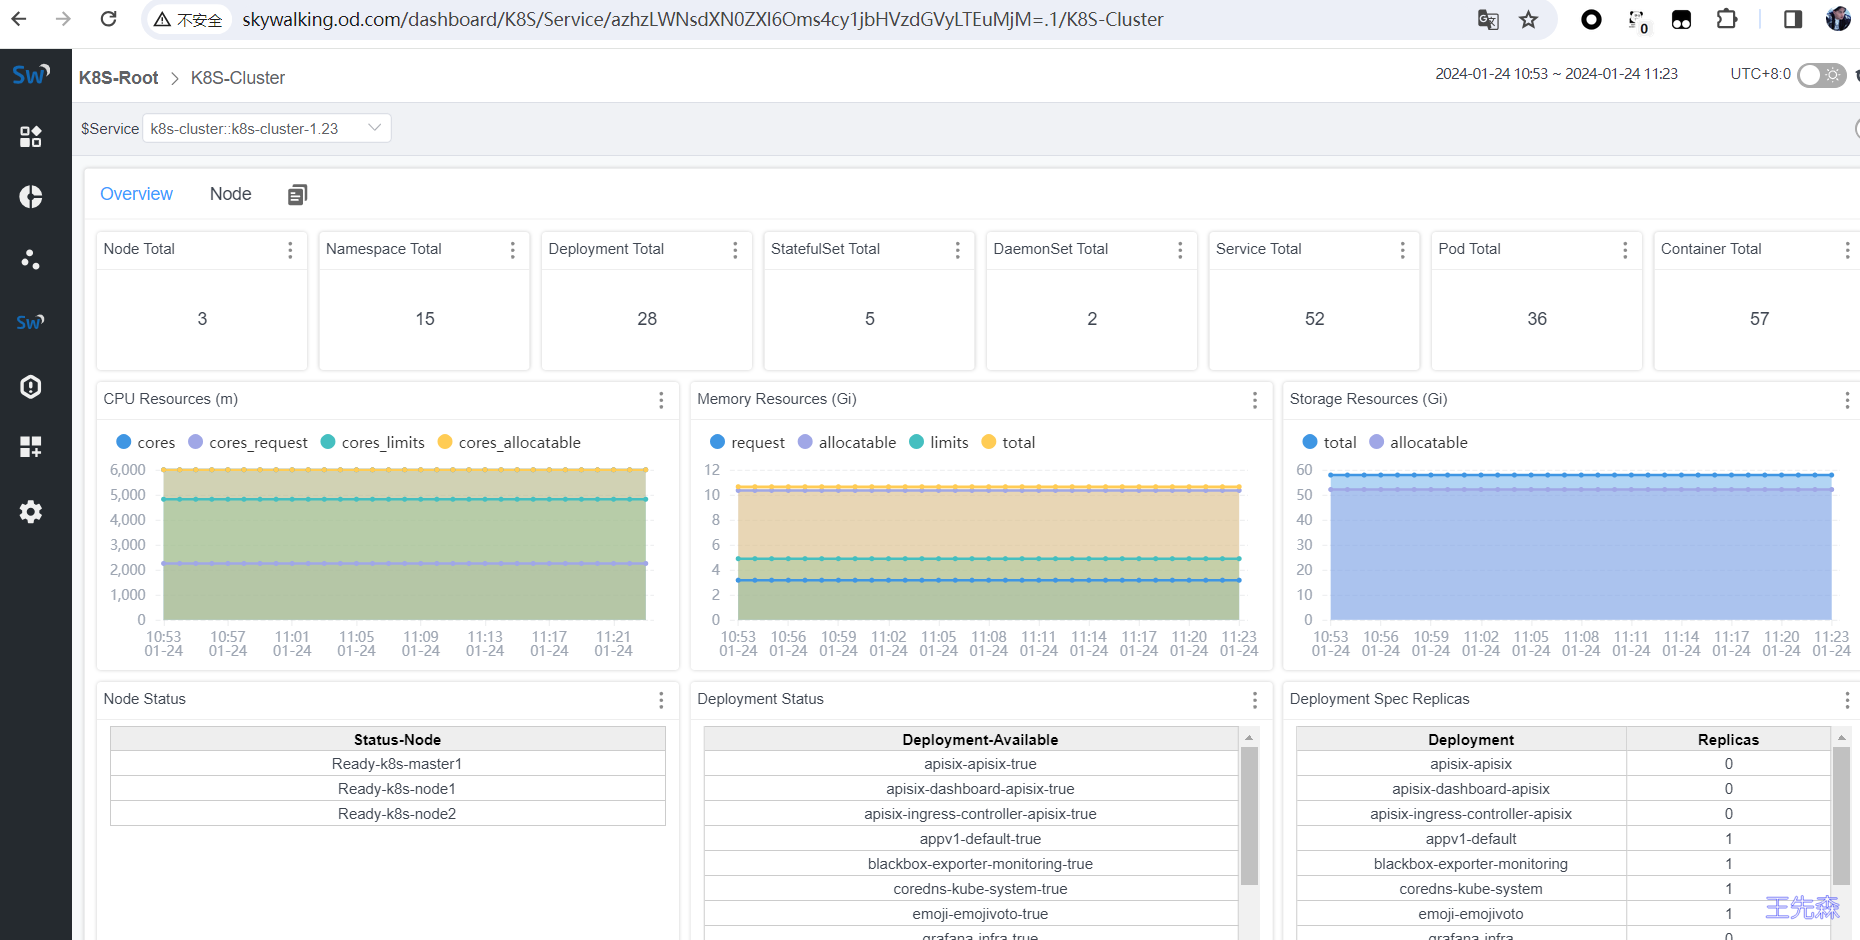
打开http://skywalking.od.com/ 你会发现自动出现Kubernetes 监控指标
Skywalking自监控 开启Prometheus遥测数据 默认情况下, 遥测功能(telemetry)是关闭的(selector 为 none),像这样:
1 2 3 4 5 6 7 8 9 telemetry: selector: ${SW_TELEMETRY:none} none: prometheus: host: ${SW_TELEMETRY_PROMETHEUS_HOST:0.0.0.0} port: ${SW_TELEMETRY_PROMETHEUS_PORT:1234} sslEnabled: ${SW_TELEMETRY_PROMETHEUS_SSL_ENABLED:false} sslKeyPath: ${SW_TELEMETRY_PROMETHEUS_SSL_KEY_PATH:""} sslCertChainPath: ${SW_TELEMETRY_PROMETHEUS_SSL_CERT_CHAIN_PATH:""}
Prometheus 可做为遥测功能(telemetry)的实现者。使用这个功能,Prometheus 就可以收集 Skywalking OAP 的 metrics 数据。
1 2 3 4 5 6 7 8 9 10 11 12 13 14 15 16 17 18 19 containers: - name: oap image: skywalking.docker.scarf.sh/apache/skywalking-oap-server:9.7.0 imagePullPolicy: IfNotPresent ..... ports: - containerPort: 11800 name: grpc - containerPort: 1234 name: prometheus-port - containerPort: 12800 name: rest env: - name: JAVA_OPTS value: "-Dmode=no-init -Xmx2g -Xms2g" - name: TZ value: Asia/Shanghai - name: SW_TELEMETRY value: "prometheus"
默认情况下,端点在开放在 http://0.0.0.0:1234 和 http://0.0.0.0:1234/metrics。也可以根据需要设置主机和端口。
设置OpenTelemetry收集器并配置数据抓取任务:
1 2 3 4 5 6 7 8 9 10 11 12 13 14 15 - job_name: 'skywalking-so11y' metrics_path: '/metrics' kubernetes_sd_configs: - role: pod relabel_configs: - source_labels: [__meta_kubernetes_pod_container_name , __meta_kubernetes_pod_container_port_name ] action: keep regex: oap;prometheus-port - source_labels: [] target_label: service replacement: oap-server - source_labels: [__meta_kubernetes_pod_name ] target_label: host_name regex: (.+) replacement: $$1
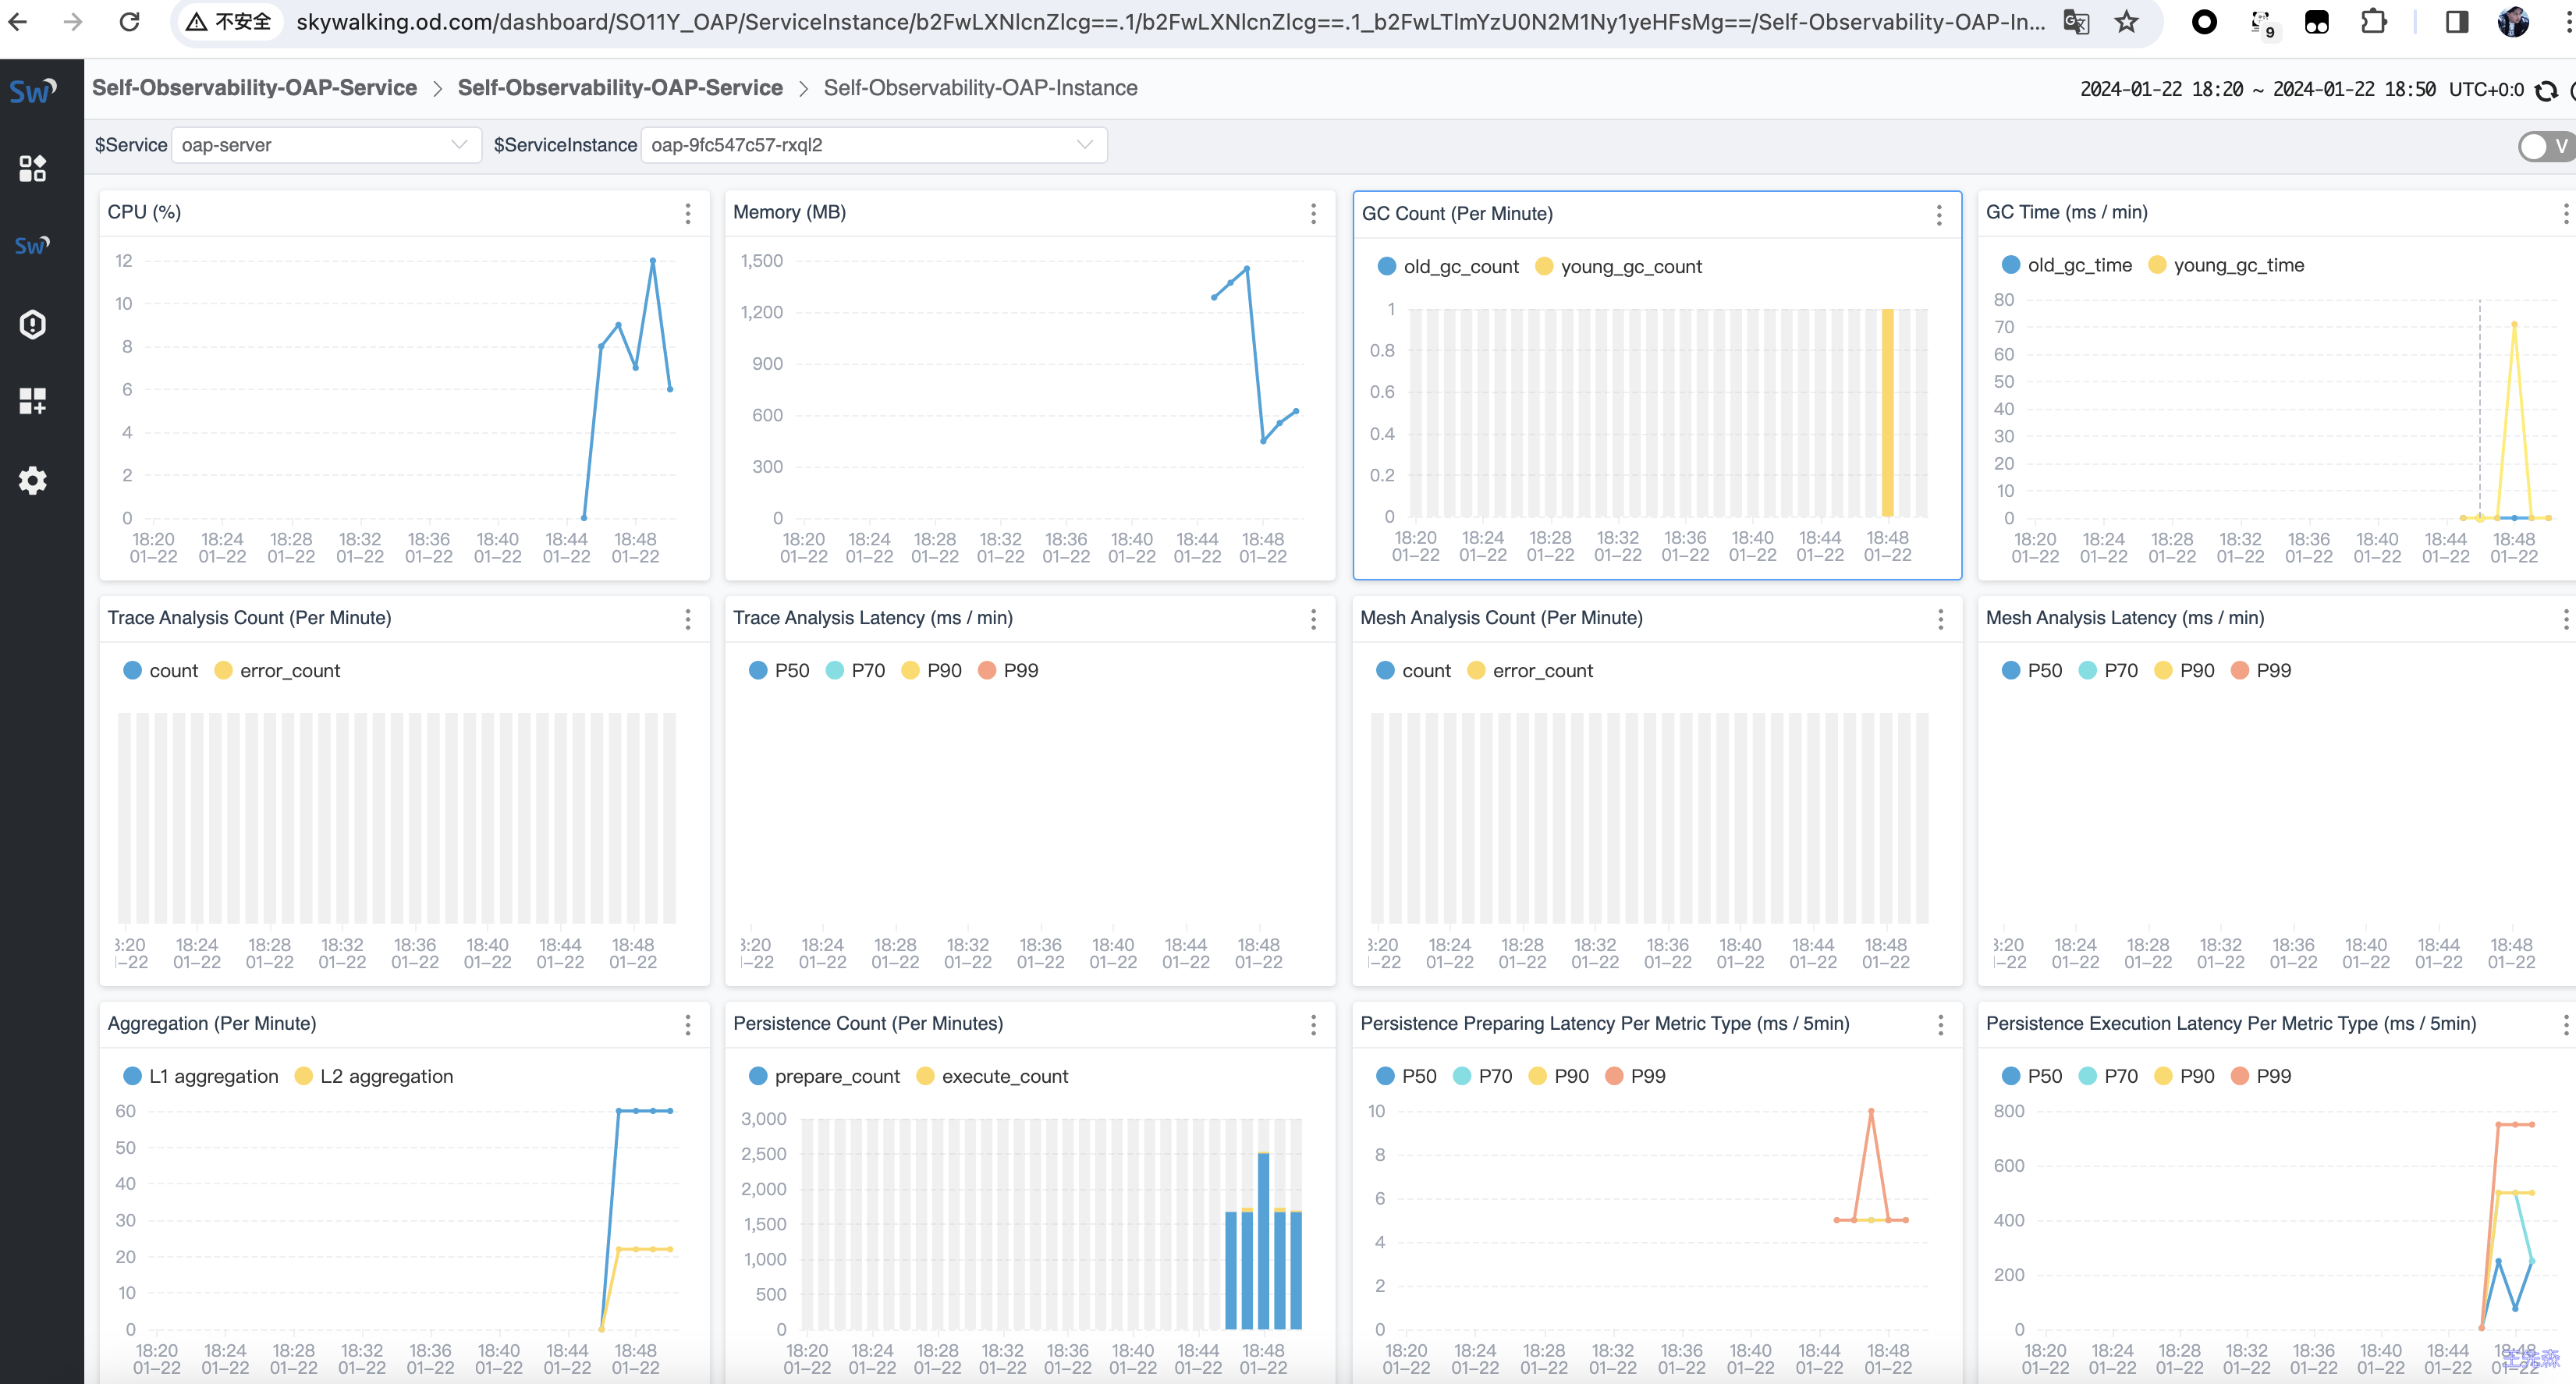
打开http://skywalking.od.com/ 你会发现自动出现自监控 监控指标
Skywalking监控系统 SkyWalking 利用 Prometheus 的node-exporter收集指标数据,并利用 OpenTelemetry Collector 将指标传输到 OpenTelemetry 接收器并传输到OAP中。
安装node-exporter 本次安装采用的是 Prometheus Operator 中部署的node-exporter ,如果你想只想安装 node-exporter 请关注公众号回复:node-exporter 获取yaml。
配置OpenTelemetry Collector 官方样本:https://github.com/apache/skywalking/blob/master/test/e2e-v2/cases/vm/prometheus-node-exporter/otel-collector-config.yaml
1 2 3 4 5 6 7 8 9 10 11 12 13 - job_name: "vm-monitoring" scrape_interval: 10s scheme: https metrics_path: /metrics tls_config: insecure_skip_verify: true ca_file: /var/run/secrets/kubernetes.io/serviceaccount/ca.crt authorization: credentials_file: /var/run/secrets/kubernetes.io/serviceaccount/token static_configs: - targets: ["k8s-master:9100" ] - targets: ["k8s-node1:9100" ] - targets: ["k8s-node2:9100" ]
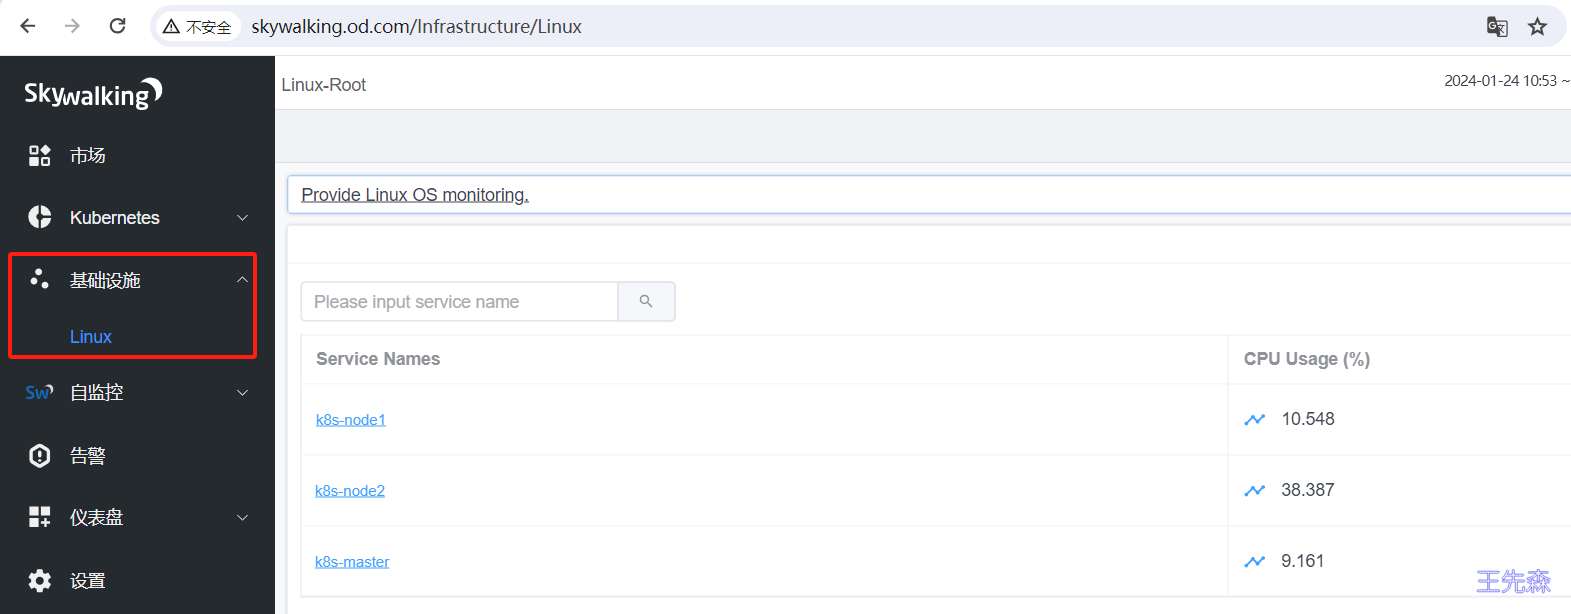
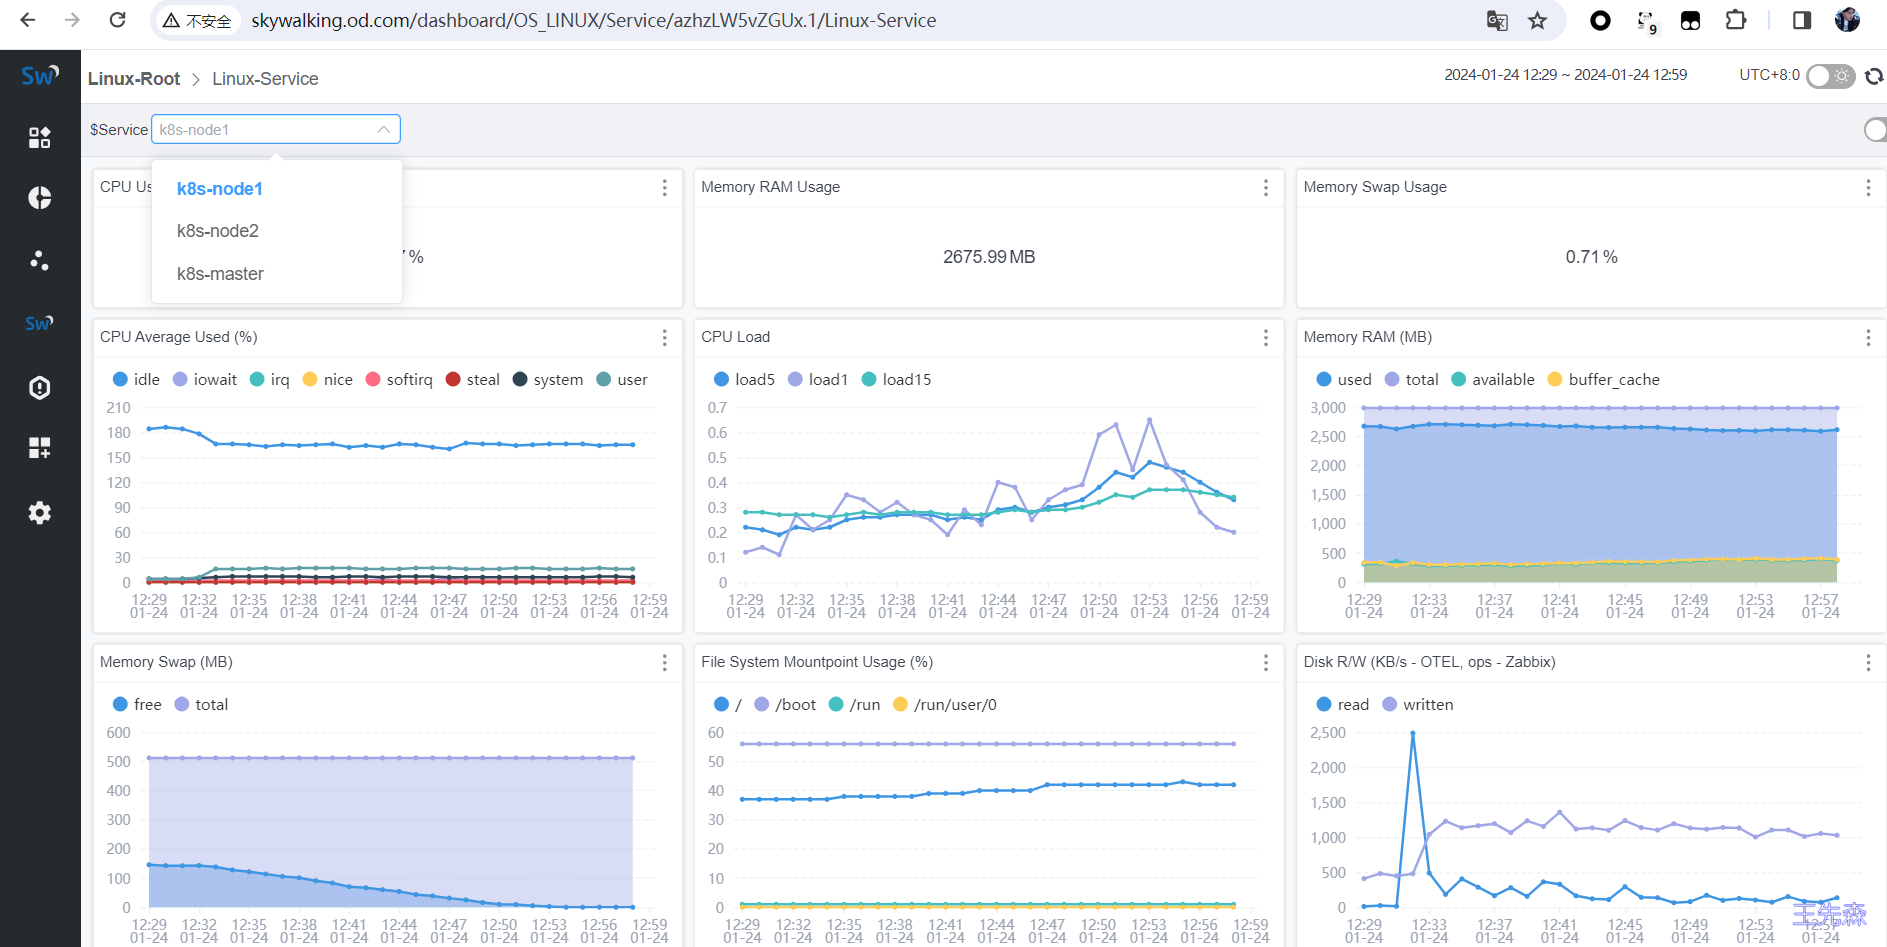
打开http://skywalking.od.com/ 你会发现自动出现基础设施 监控指标
Skywalking监控APISIX 修改apisix配置文件 1 2 3 4 5 6 7 8 9 10 11 12 13 14 15 16 17 plugin_attr: skywalking: service_name: APISIX service_instance_name: APISIX Instance Name endpoint_addr: http://oap-svc.skywalking:12800 report_interval: 3 prometheus: export_uri: /apisix/prometheus/metrics metric_prefix: apisix_ enable_export_server: true export_addr: ip: 0.0 .0 .0 port: 9091 plugins: - skywalking
关于skywalking的配置,在上面配置文件中已经都注释了,可以仔细看看配置文件内容。
plugin_attr属性的skywalking属性参数如下表所示:
名称 类型 默认值 描述 service_name string “APISIX” SkyWalking 上报的服务名称。 service_instance_name string “APISIX Instance Name” SkyWalking 上报的服务实例名。设置为 $hostname 时,将获取本机主机名。 endpoint_addr string “http://127.0.0.1:12800 “ SkyWalking 的 HTTP endpoint 地址,例如:http://127.0.0.1:12800。 report_interval integer SkyWalking 客户端内置的值 上报间隔时间,单位为秒。
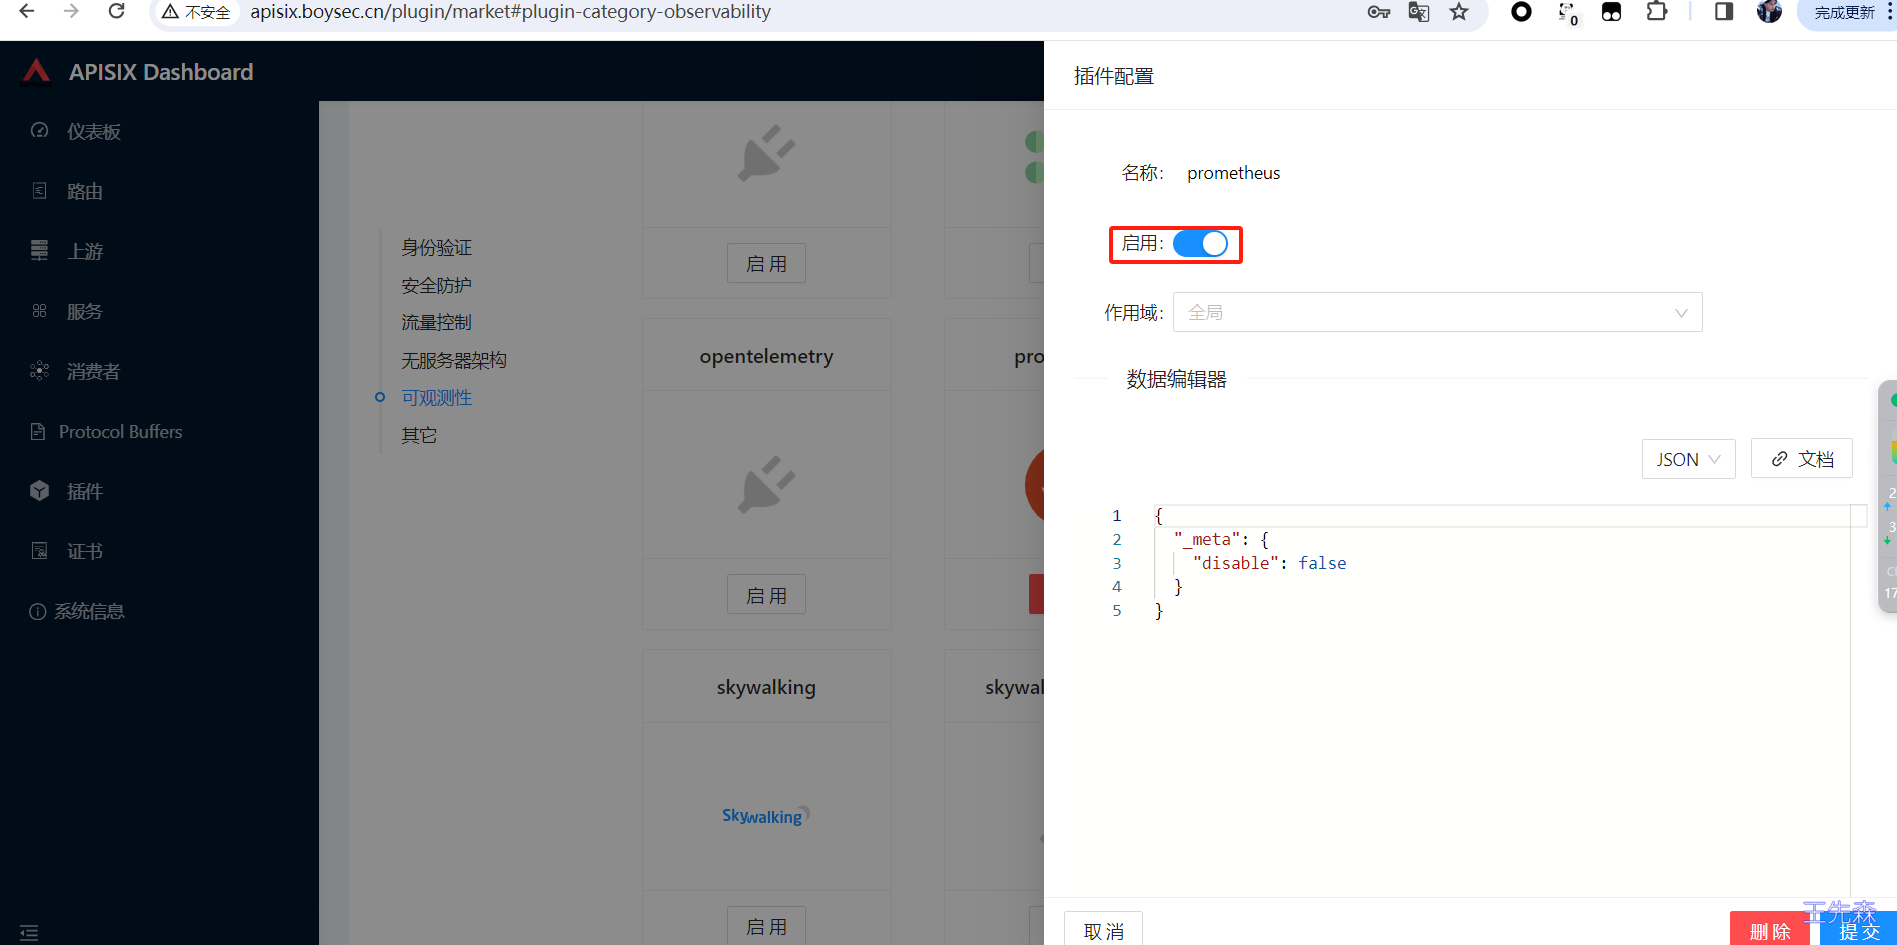
开启prometheus插件 这里是全局开启prometheus插件,也针对指定域名通过plugins单独开启,如果不开启插件则不能读取出apisix_http_status、apisix_http_latency_*等几个参数信息。
配置OpenTelemetry Collector 官方样本:https://github.com/apache/skywalking/blob/master/test/e2e-v2/cases/apisix/otel-collector/otel-collector-config.yaml
1 2 3 4 5 6 - job_name: 'apisix-monitoring' metrics_path: /apisix/prometheus/metrics static_configs: - targets: ['apisix-admin.apisix:9091' ] labels: skywalking_service: ApiSix
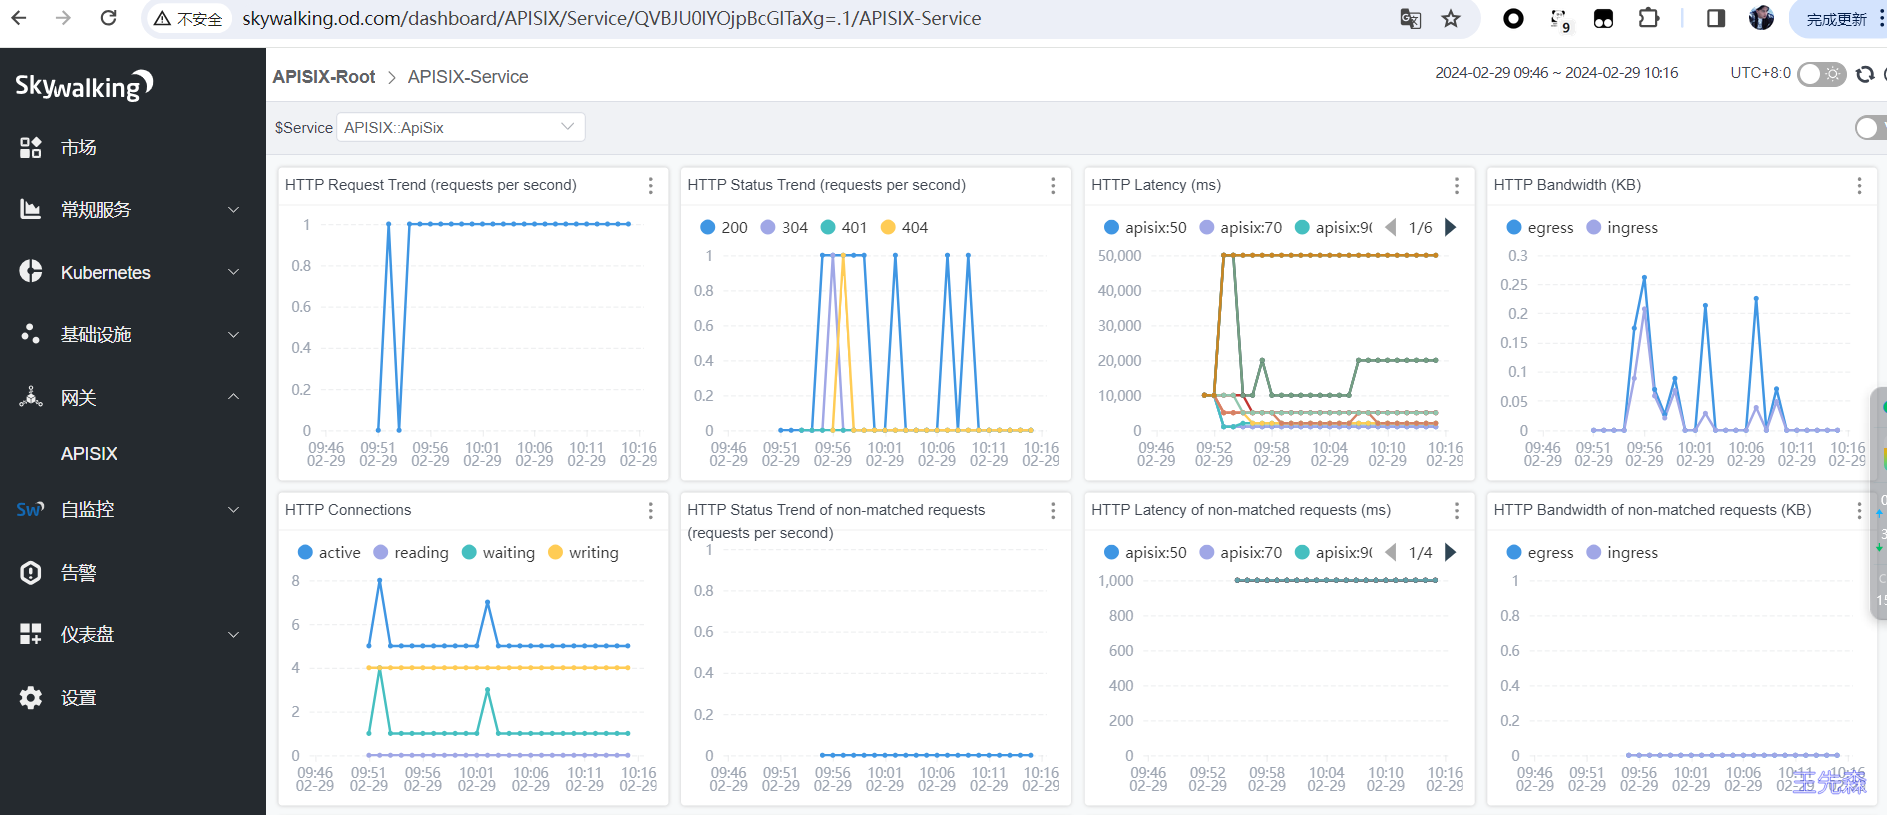
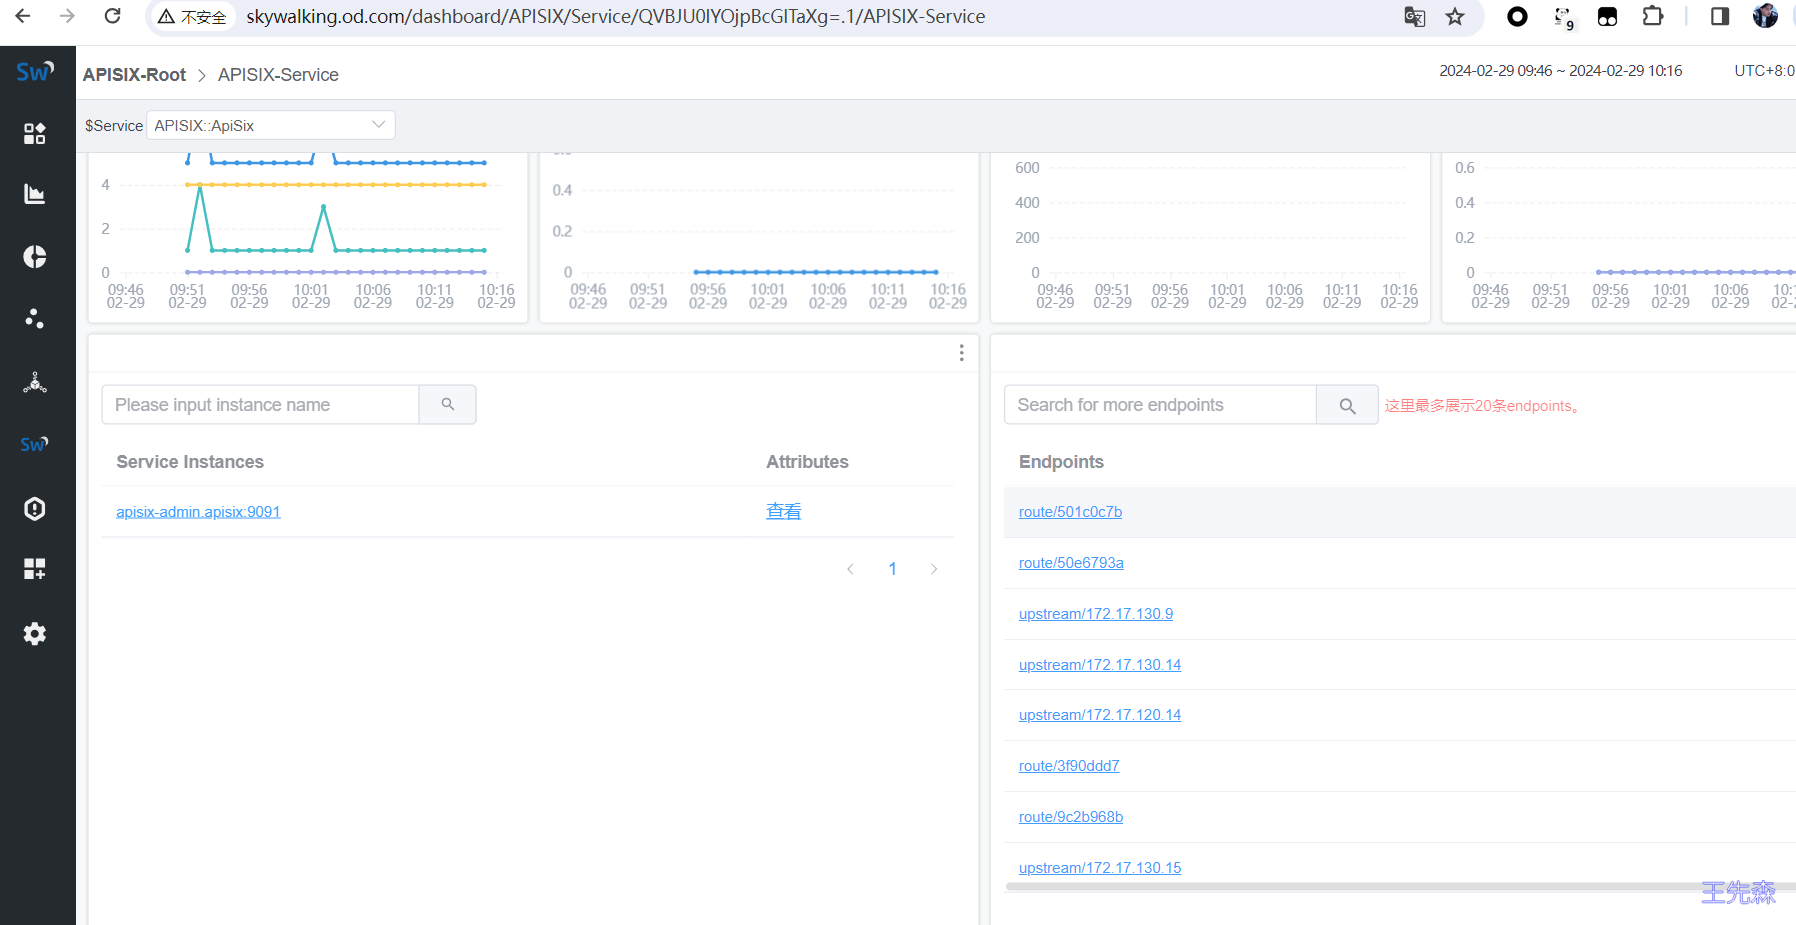
打开http://skywalking.od.com/ 你会发现自动出现网关 监控指标
Skywalking监控Elasticsearch 部署Elasticsearch-exporter 在使用 ElasticSearch 时,为了对集群及索引状态等运行状态进行监控,你可以使用 Prometheus 监控服务提供的基于 Exporter 的方式。这种方式可以轻松监控 ElasticSearch 的运行状态,并使用内置的 Grafana 监控大盘,使监控变得更加易于管理和可视化。
1 2 3 4 5 6 7 8 9 10 11 12 13 14 15 16 17 18 19 20 21 22 23 24 25 26 27 28 29 30 31 32 33 34 35 36 37 38 39 40 41 42 43 44 45 46 47 48 49 50 51 apiVersion: apps/v1 kind: Deployment metadata: labels: k8s-app: es-prod-exporter name: es-prod-exporter namespace: monitoring spec: replicas: 1 selector: matchLabels: k8s-app: es-prod-exporter template: metadata: labels: k8s-app: es-prod-exporter spec: containers: - name: es-prod-exporter image: quay.io/prometheuscommunity/elasticsearch-exporter:v1.7.0 args: - '--es.uri=http://elastic:admin123@elastic.od.com' - '--es.all' - '--es.indices' - '--es.indices_settings' - '--es.indices_mappings' - '--es.shards' - '--collector.snapshots' - '--es.timeout=30s' imagePullPolicy: IfNotPresent ports: - containerPort: 9114 name: metric-port securityContext: privileged: false restartPolicy: Always --- apiVersion: v1 kind: Service metadata: name: es-exporter labels: k8s-app: es-prod-exporter namespace: monitoring spec: ports: - name: metric-port port: 9114 selector: k8s-app: es-prod-exporter
常用参数解释:
1 2 3 4 5 6 7 8 # --es.uri 默认http://localhost:9200,连接到的Elasticsearch节点的地址(主机和端口)。 这可以是本地节点(例如localhost:9200),也可以是远程Elasticsearch服务器的地址。 --es.all 默认flase,如果为true,则查询群集中所有节点的统计信息,而不仅仅是查询我们连接到的节点。 --es.cluster_settings 默认flase,如果为true,请在统计信息中查询集群设置 --es.indices 默认flase,如果为true,则查询统计信息以获取集群中的所有索引。 --es.indices_settings 默认flase,如果为true,则查询集群中所有索引的设置统计信息。 --es.shards 默认flase,如果为true,则查询集群中所有索引的统计信息,包括分片级统计信息(意味着es.indices = true)。 --collector.snapshots 默认flase,如果为true,则查询集群快照的统计信息。
部署服务
1 kubectl apply -f es-exporter.yaml
配置OpenTelemetry Collector 官方样本:https://github.com/apache/skywalking/blob/master/test/e2e-v2/cases/elasticsearch/otel-collector-config.yaml
1 2 3 4 5 6 7 - job_name: 'elasticsearch-monitoring' metrics_path: /metrics scrape_interval: 30s static_configs: - targets: ['es-exporter.monitoring:9114' ]
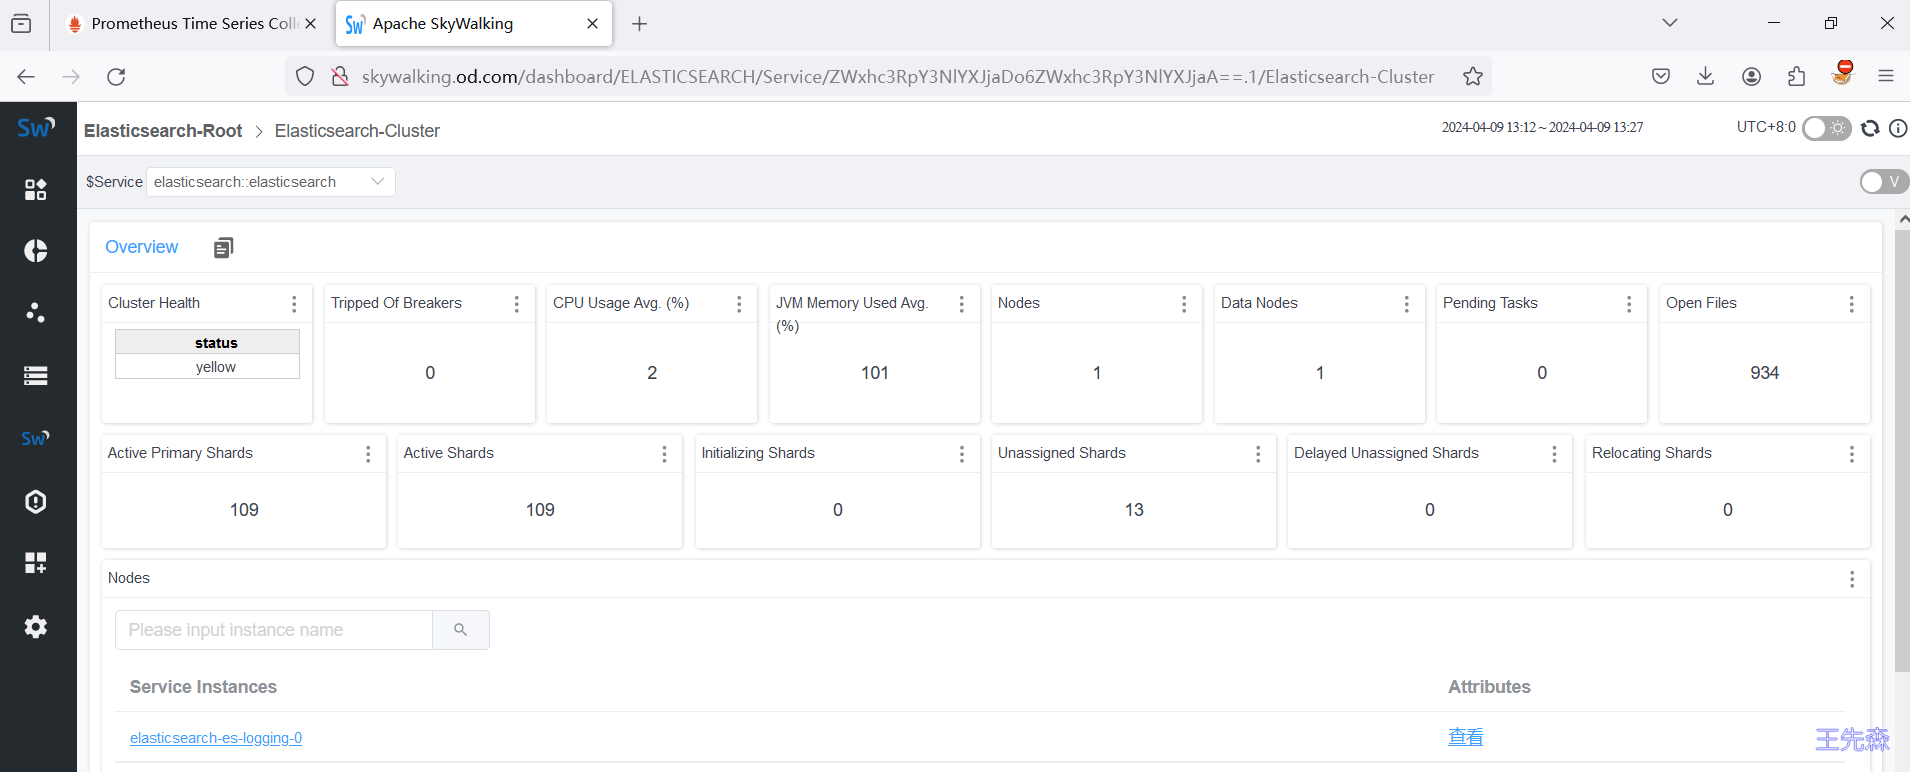
打开http://skywalking.od.com/ 你会发现自动出现数据库 监控指标


