简介
白盒监控vs黑盒监控
白盒监控:监控主机的资源用量、容器的运行状态、数据库中间件的运行数据等等,这些都是支持业务和服务的基础设施,通过白盒能够了解其内部的实际运行状态,通过对监控指标的观察能够预判可能出现的问题,从而对潜在的不确定因素进行优化。
黑盒监控:以用户的身份测试服务的外部可见性,常见的黑盒监控包括 HTTP 探针 TCP 探针 等用于检测站点或者服务的可访问性,以及访问效率等。
黑盒监控相较于白盒监控最大的不同在于黑盒监控是以故障为导向的. 当故障发生时,黑盒监控能快速发现故障,而白盒监控则侧重于主动发现或者预测潜在的问题。一个完善的监控目标是要能够从白盒的角度发现潜在问题,能够在黑盒的角度快速发现已经发生的问题。
blackbox exporter
Blackbox Exporter 是 Prometheus 社区提供的官方黑盒监控解决方案,其允许用户通过 HTTP HTTPS DNS TCP ICMP 以及 gPRC 的方式对 endpoints 端点进行探测。可以用于下面的这些场景:
- HTTP 测试:定义 Request Header 信息、判断 Http status、Response Header、Body 内容
- TCP 测试:业务组件端口状态监听、应用层协议定义与监听
- ICMP 测试:主机探活机制
- POST 测试:接口联通性
- SSL:证书过期时间
Prometheus Operator 中提供了一个 Probe CRD 对象可以用来进行黑盒监控,我们需要单独运行一个 Blackbox 服务,然后作为一个 prober 提供给 Probe 对象使用。
Probe CRD
Probe 的 API 文档
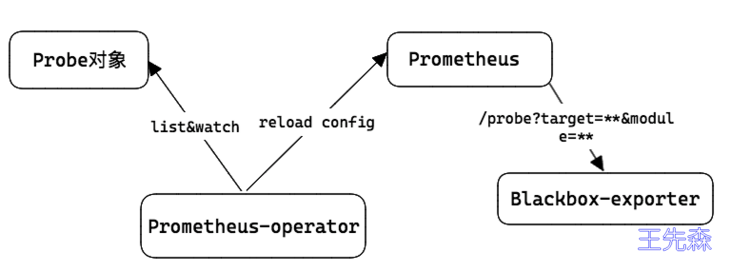
prometheus-operator 提供了一个 Probe CRD 对象,可以用来进行黑盒监控,具体的探测功能由 Blackbox-exporter 实现。
Probe 支持 staticConfig 和 ingress 两种配置方式, 使用 ingress 时可以自动发现 ingress 代理的 url 并进行探测
大概步骤:
- 首先,用户创建一个 Probe CRD 对象,对象中指定探测方式、探测目标等参数;
- 然后,prometheus-operator watch 到 Probe 对象创建,然后生成对应的 prometheus 拉取配置,reload 到prometheus 中;
- 最后,prometheus 使用
url=/probe?target={探测目标}&module={探测方式},拉取 blackbox-exporter ,此时 blackbox-exporter 会对目标进行探测,并以 metrics 格式返回探测结果;

部署 Blackbox Exporter
运行 Blackbox Exporter 时,需要用户提供探针的配置信息,这些配置信息可能是一些自定义的 HTTP 头信息,也可能是探测时需要的一些 TSL 配置,也可能是探针本身的验证行为,在 Blackbox Exporter 中每一个探针配置称为一个 module,并且以 YAML 配置文件的形式提供,每一个 module 主要包含:探针类型(prober)、验证访问超时时间(timeout)、以及当前探针的具体配置项:
1
2
3
4
5
6
7
8
9
10
|
prober: <prober_string>
[timeout: <duration>]
[ http: <http_probe> ]
[ tcp: <tcp_probe> ]
[ dns: <dns_probe> ]
[ icmp: <icmp_probe> ]
[ grpc: <grpc_probe> ]
|
比如下面的这段配置就包含两个 HTTP 探针配置项:
1
2
3
4
5
6
7
8
9
10
11
12
13
14
| modules:
http_2xx:
prober: http
timeout: 5s
http:
"preferred_ip_protocol": "ip4"
valid_http_versions: ['HTTP/1.1', 'HTTP/2']
valid_status_codes: [200]
method: GET
http_post_2xx:
prober: http
http:
method: POST
"preferred_ip_protocol": "ip4"
|
在 Kubernetes 集群中运行 Blackbox Exporter 服务,其实在前面的 kube-prometheus 中已经安装过了,我们可以先看下其配置清单:
1
2
3
4
5
6
7
8
9
10
11
12
13
14
15
16
17
18
19
20
21
22
23
24
25
26
27
28
29
30
31
32
33
34
35
36
37
38
39
40
41
42
43
44
45
46
47
48
49
50
51
52
53
54
|
apiVersion: v1
data:
config.yml: |-
"modules":
"http_2xx":
"http":
"preferred_ip_protocol": "ip4"
"prober": "http"
"http_post_2xx": # POST 请求
"http":
"method": "POST"
"preferred_ip_protocol": "ip4"
"prober": "http"
"irc_banner": # irc 协议
"prober": "tcp"
"tcp":
"preferred_ip_protocol": "ip4"
"query_response":
- "send": "NICK prober"
- "send": "USER prober prober prober :prober"
- "expect": "PING :([^ ]+)"
"send": "PONG ${1}"
- "expect": "^:[^ ]+ 001"
"pop3s_banner": # pop3 检测
"prober": "tcp"
"tcp":
"preferred_ip_protocol": "ip4"
"query_response":
- "expect": "^+OK"
"tls": true
"tls_config":
"insecure_skip_verify": false
"ssh_banner": # ssh 检测
"prober": "tcp"
"tcp":
"preferred_ip_protocol": "ip4"
"query_response":
- "expect": "^SSH-2.0-"
"tcp_connect": # tcp 连接
"prober": "tcp"
"tcp":
"preferred_ip_protocol": "ip4"
icmp: # ping 检测服务器的存活
prober: icmp
kind: ConfigMap
metadata:
labels:
app.kubernetes.io/component: exporter
app.kubernetes.io/name: blackbox-exporter
app.kubernetes.io/part-of: kube-prometheus
app.kubernetes.io/version: 0.24.0
name: blackbox-exporter-configuration
namespace: monitoring
|
DNS 黑盒监控
默认配置下的 blackbox exporter 未开启 dns 模块,修改 blackboxExporter-configuration.yaml 文件, 这里我们将 irc、ssh 和 pop3 的检测模块去掉,新增 dns 模块,修改后的配置文件如下所示:
1
2
3
4
5
6
7
8
9
10
11
12
13
14
15
16
17
18
19
20
21
22
23
24
25
26
27
28
29
30
31
32
| apiVersion: v1
data:
config.yml: |-
"modules":
"http_2xx":
"http":
"preferred_ip_protocol": "ip4"
"prober": "http"
"http_post_2xx":
"http":
"method": "POST"
"preferred_ip_protocol": "ip4"
"prober": "http"
"tcp_connect":
"prober": "tcp"
"tcp":
"preferred_ip_protocol": "ip4"
"dns": # DNS 检测模块
"prober": "dns"
"dns":
"transport_protocol": "udp" # 默认是 udp,tcp
"preferred_ip_protocol": "ip4" # 默认是 ip6
query_name: "kubernetes.default.svc.cluster.local" # 利用这个域名来检查dns服务器
kind: ConfigMap
metadata:
labels:
app.kubernetes.io/component: exporter
app.kubernetes.io/name: blackbox-exporter
app.kubernetes.io/part-of: kube-prometheus
app.kubernetes.io/version: 0.24.0
name: blackbox-exporter-configuration
namespace: monitoring
|
更新 configmap 配置文件, prometheus-opertor 会 watch 到更新然后通过 pod 中的 module-configmap-reloader 容器通知 blackbox-exporter 重载配置
如果是手动部署的 Prometheus 可以直接在 Prometheus 对应的配置文件中添加监控任务即可,比如要添加一个 ping 的任务:
1
2
3
4
5
6
7
8
9
10
11
12
13
14
15
16
| - job_name: 'ping'
metrics_path: /probe
params:
modelus: [icmp]
static_configs:
- targets:
- x.x.x.x
lables:
instance: wangxiansen
relabel_configs:
- source_labels: [__address__]
target_label: __param_target
- source_labels: [__param_target]
target_label: instance
- target_label: __address__
replacement: x.x.x.x:9115
|
这里使用的是 Prometheus Operator,我们可以只有使用 Probe 这个 CRD 对象来添加网络探测任务,关于这个对象的使用方法可以通过 kubectl explain probe 或者 API 文档 来了解更多。
比如这里我们来新增一个对coredns进行dns解析任务,创建一个如下所示的 Probe 资源对象:
1
2
3
4
5
6
7
8
9
10
11
12
13
14
15
16
17
|
apiVersion: monitoring.coreos.com/v1
kind: Probe
metadata:
name: blackbox-coredns
namespace: monitoring
spec:
jobName: blackbox-coredns
interval: 10s
module: dns
prober:
url: blackbox-exporter:19115
path: /probe
targets:
staticConfig:
static:
- coredns.kube-system:53
|
直接创建上面的资源清单即可
1
2
3
4
| $ kubectl apply -f coredns-blackbox.yaml
$ kubectl get probe -n monitoring
NAME AGE
blackbox-coredns 93s
|
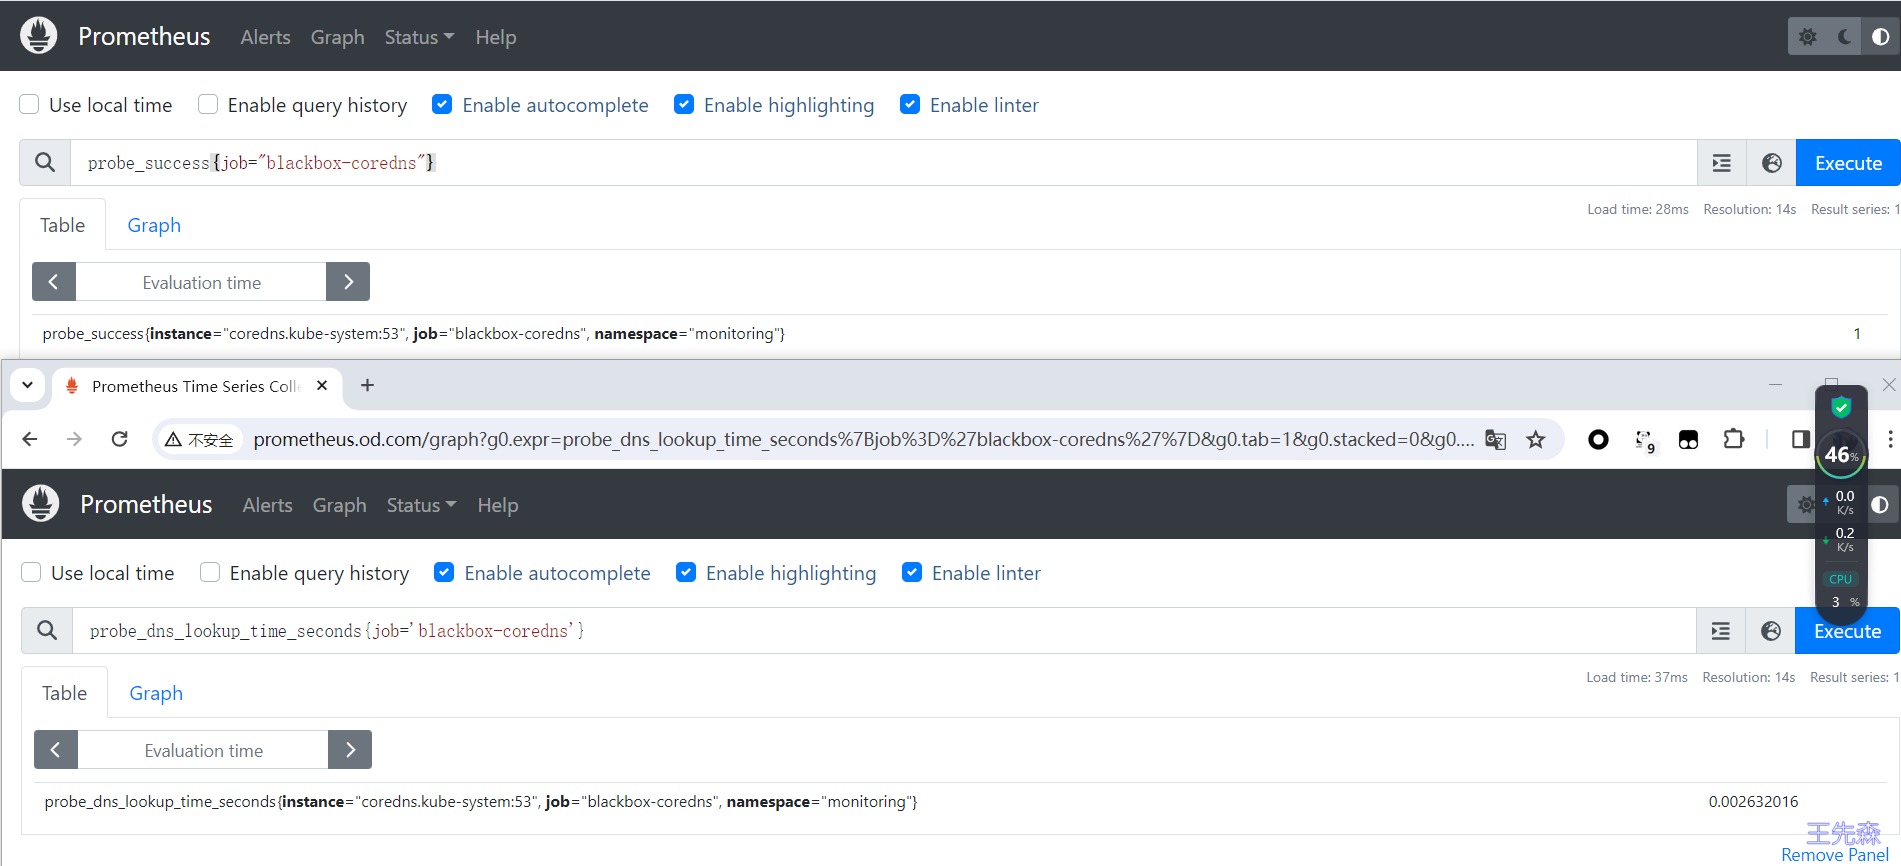
创建后正常隔一会儿在 Prometheus 里面就可以看到抓取的任务了。

现在可以通过:
probe_success{job="blackbox-coredns"} 查看服务状态是否可用probe_dns_lookup_time_seconds{job='blackbox-coredns'} DNS解析耗时
查看 blackbox exporter 一次 coredns探测生成的 metrics 指标

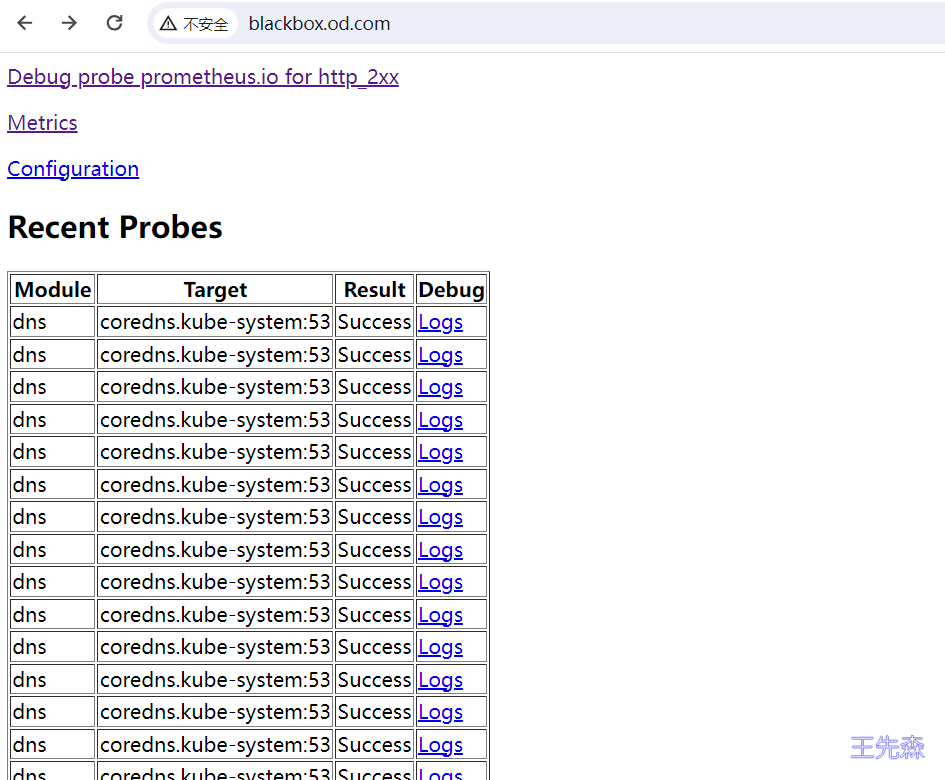
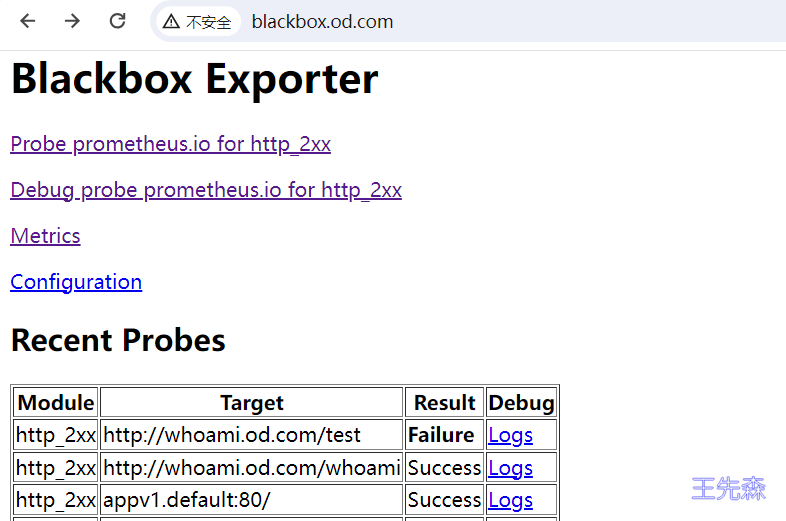
在blackbox exporter 页面中也会显示探测结果

http 黑盒监控
http 探测一般使用 http_2xx 模块, 虽然默认有这个模块, 但是默认的配置不太合理, 我们修改一下
1
2
3
4
5
6
7
8
9
10
11
12
13
14
15
16
17
18
19
20
21
22
23
24
25
26
27
28
29
30
31
32
33
34
35
36
| apiVersion: v1
data:
config.yml: |-
"modules":
"http_2xx":
"http":
"preferred_ip_protocol": "ip4"
"valid_status_codes": [200]
"valid_http_versions": ["HTTP/1.1", "HTTP/2.0"]
"method": "GET"
follow_redirects: true # 允许301,302跳转重定向,
"prober": "http"
"http_post_2xx":
"http":
"method": "POST"
"preferred_ip_protocol": "ip4"
"prober": "http"
"tcp_connect":
"prober": "tcp"
"tcp":
"preferred_ip_protocol": "ip4"
"dns": # DNS 检测模块
"prober": "dns"
"dns":
"transport_protocol": "udp" # 默认是 udp,tcp
"preferred_ip_protocol": "ip4" # 默认是 ip6
query_name: "kubernetes.default.svc.cluster.local" # 利用这个域名来检查dns服务器
kind: ConfigMap
metadata:
labels:
app.kubernetes.io/component: exporter
app.kubernetes.io/name: blackbox-exporter
app.kubernetes.io/part-of: kube-prometheus
app.kubernetes.io/version: 0.24.0
name: blackbox-exporter-configuration
namespace: monitoring
|
更新配置
1
| kubectl apply -f blackboxExporter-configuration1.yaml
|
创建一个用于检测网站 HTTP 服务是否正常的任务
1
2
3
4
5
6
7
8
9
10
11
12
13
14
15
16
17
|
apiVersion: monitoring.coreos.com/v1
kind: Probe
metadata:
name: domain-probe
namespace: monitoring
spec:
jobName: domain-probe
prober:
url: blackbox-exporter:19115
module: http_2xx
targets:
staticConfig:
static:
- www.boysec.cn
- appv1.default
|
直接创建该资源对象:
1
2
3
4
5
| $ kubectl apply -f domain-blackbox.yaml
$ kubectl get probe -n monitoring
NAME AGE
blackbox-coredns 17m
domain-probe 30s
|
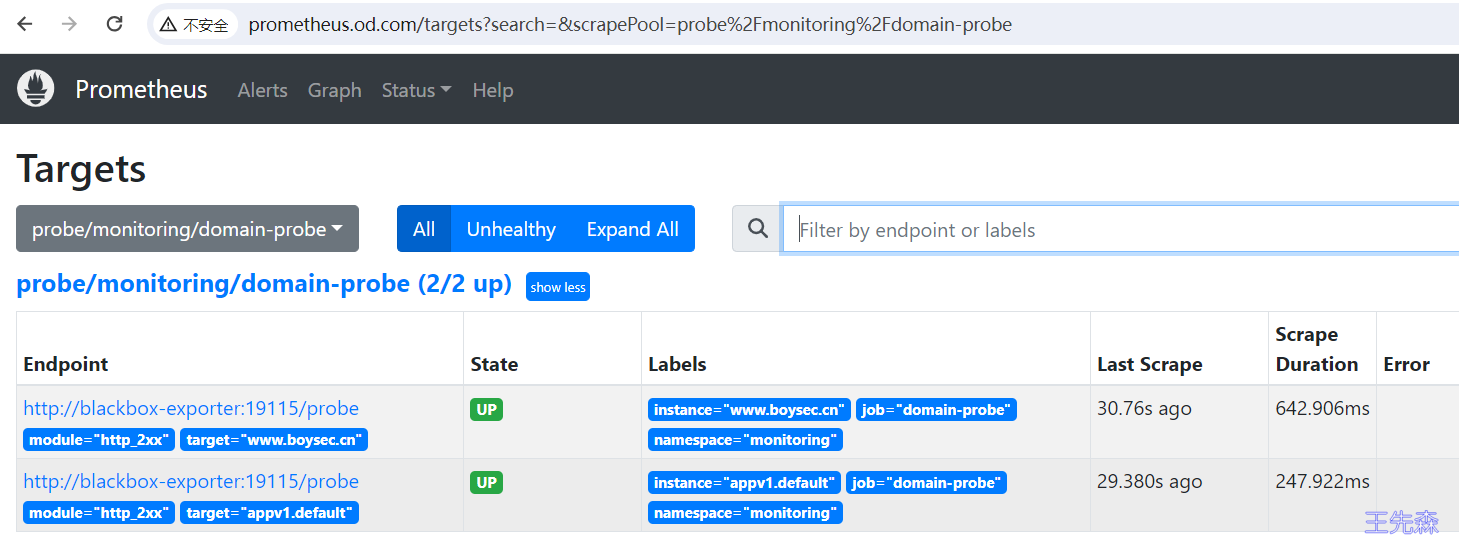
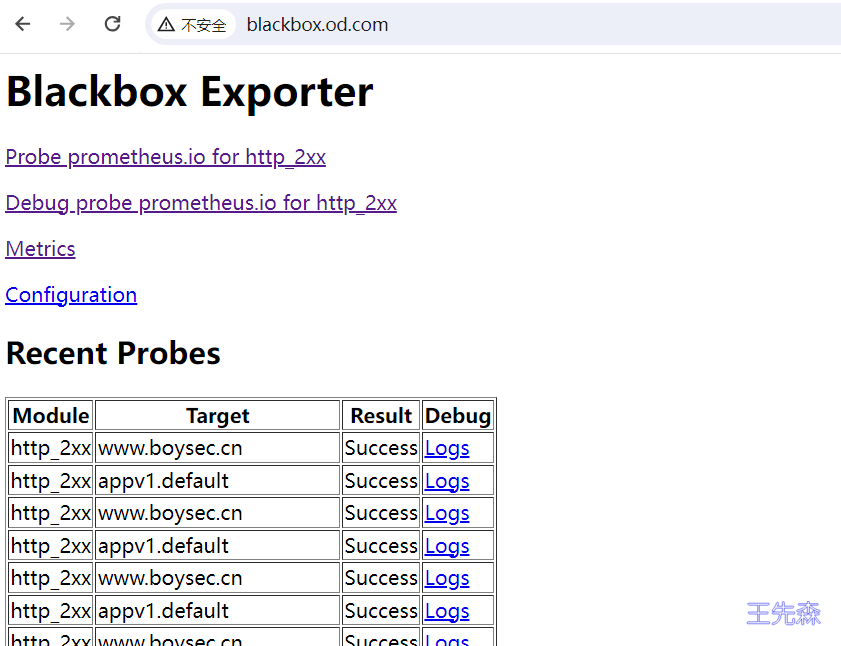
创建后同样可以在 Prometheus 、Blackbox 中看到对应的任务


我们可以使用 probe_ssl_earliest_cert_expiry 来判断 TLS 证书是否过期了:
1
2
3
4
5
6
7
8
9
10
| - name: ssl_expiry
rules:
- alert: Ssl Cert Will Expire in 7 days
expr: probe_ssl_earliest_cert_expiry - time() < 86400 * 7
for: 5m
labels:
severity: warning
annotations:
summary: '域名证书即将过期 (instance {{ $labels.instance }})'
description: "域名证书 7 天后过期 \n VALUE = {{ $value }}\n LABELS: {{ $labels }}"
|
Ingress黑盒监控
接下来使用 ingrss 自动发现实现集群内的 ingress 并进行黑盒探测,目前 prometheus operator 只支持 ingress 方式的自动发现,而且自定义配置其实不是很多
创建web应用
1
2
3
4
5
6
7
8
9
10
11
12
13
14
15
16
17
18
19
20
21
22
23
24
25
26
27
28
29
30
31
32
33
34
35
36
37
38
39
40
41
42
43
44
45
46
47
48
49
50
51
52
53
54
55
56
57
58
59
60
61
62
63
64
65
66
67
68
69
70
71
72
73
74
75
76
77
78
79
80
81
82
83
84
85
86
87
88
89
90
91
92
93
94
95
96
97
98
99
100
101
102
103
104
105
106
107
108
109
| apiVersion: apps/v1
kind: Deployment
metadata:
name: appv1
labels:
app: appv1
spec:
selector:
matchLabels:
app: appv1
template:
metadata:
labels:
app: appv1
spec:
containers:
- image: nginx:alpine
name: appv1
command: ["/bin/sh", "-c", "echo '你好, 这是(王先森)APP-v1服务中心'>/usr/share/nginx/html/index.html;nginx -g 'daemon off;'"]
ports:
- containerPort: 80
name: portv1
---
apiVersion: v1
kind: Service
metadata:
name: appv1
spec:
selector:
app: appv1
ports:
- name: http
port: 80
targetPort: portv1
---
apiVersion: v1
kind: Service
metadata:
name: whoami
spec:
ports:
- protocol: TCP
name: web
port: 80
selector:
app: whoami
---
kind: Deployment
apiVersion: apps/v1
metadata:
name: whoami
labels:
app: whoami
spec:
replicas: 1
selector:
matchLabels:
app: whoami
template:
metadata:
labels:
app: whoami
spec:
containers:
- name: whoami
image: containous/whoami
ports:
- name: web
containerPort: 80
---
apiVersion: networking.k8s.io/v1
kind: Ingress
metadata:
name: demo-web
namespace: default
labels:
prometheus.io/http-probe: "true"
annotations:
kubernetes.io/ingress.class: traefik
traefik.ingress.kubernetes.io/router.entrypoints: web
spec:
rules:
- host: whoami.od.com
http:
paths:
- pathType: Prefix
path: /
backend:
service:
name: appv1
port:
number: 80
- pathType: Prefix
path: /test
backend:
service:
name: appv1
port:
number: 80
- host: whoami.od.com
http:
paths:
- pathType: Prefix
path: /whoami
backend:
service:
name: whoami
port:
number: 80
|
创建 probe
可以使用 label 或者 annotation 两种方式筛选监测的 ingress, 不配置监测所有 ingress
1
2
3
4
5
6
7
8
9
10
11
12
13
14
15
16
17
18
19
20
21
22
23
24
25
26
27
28
29
30
31
|
apiVersion: monitoring.coreos.com/v1
kind: Probe
metadata:
name: blackbox-ingress
namespace: monitoring
spec:
jobName: blackbox-ingress
prober:
url: blackbox-exporter:19115
path: /probe
module: http_2xx
targets:
ingress:
namespaceSelector:
matchNames:
- default
- monitoring
selector:
matchLabels:
prometheus.io/http-probe: "true"
|
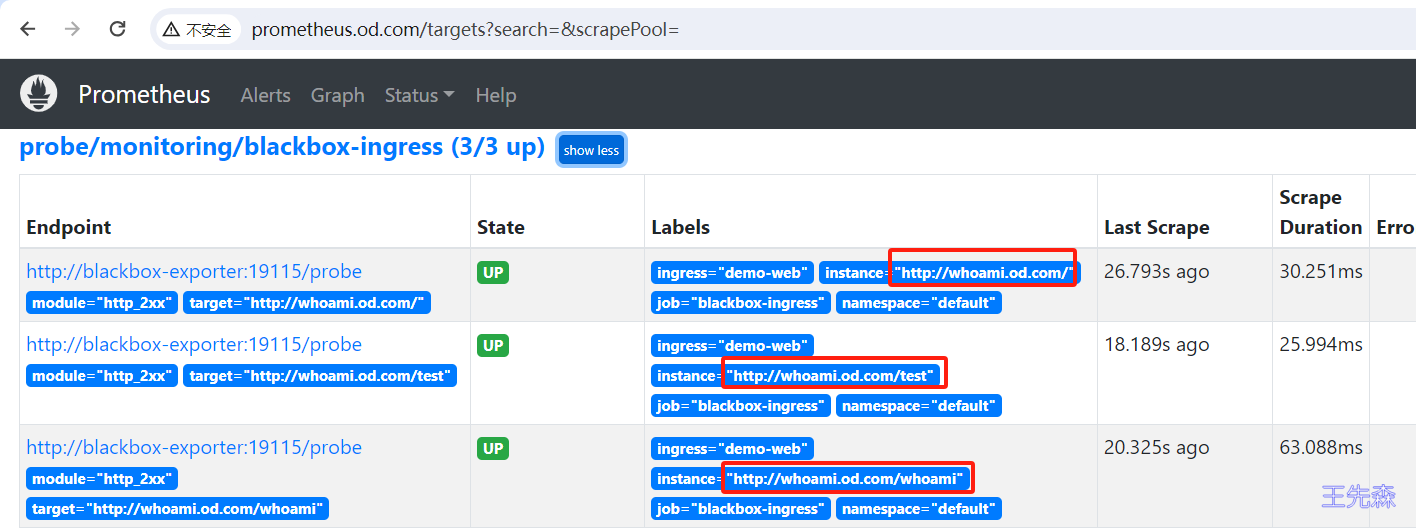
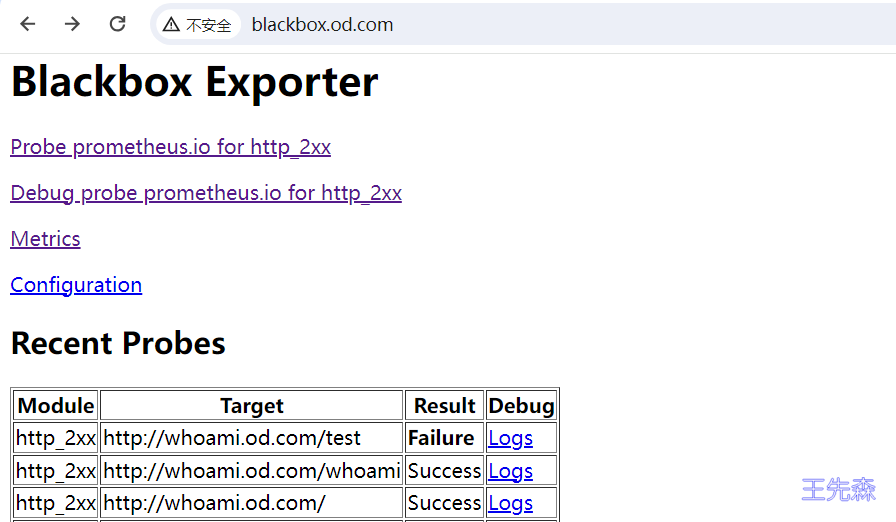
创建后同样可以在 Prometheus 、Blackbox 中看到对应的任务


通过probe_http_status_code{job="blackbox-ingress"} 获取域名状态码信息。

注意:如果没有dns服务器解析会获取不到状态信息。通过修改coredns配置也可以实现。
配置 coredns
1
2
3
4
5
6
7
8
9
10
11
12
| $ kubectl edit -n kube-system configmaps coredns
Corefile: |
.:53 {
errors
log
health
hosts { # 添加 hosts 配置
10.1.1.100 k8s-master whoami.od.com
10.1.1.120 k8s-node1 whoami.od.com
10.1.1.130 k8s-node2 whoami.od.com
fallthrough
}
|
黑盒监控自动发现
比起Ingress黑盒监控更推荐使用 additionalScrapeConfigs 静态配置的方式实现。
service自动发现
同样使用appv1和whoami这俩个应用
修改 service appv1, 添加 annotation
1
2
3
4
5
6
7
8
| $ kubectl edit svc appv1
apiVersion: v1
kind: Service
metadata:
annotations:
prometheus.io/http-probe: "true" # 控制是否监测
prometheus.io/http-probe-path: / # 控制监测路径
prometheus.io/http-probe-port: "80" # 控制监测端口
|
添加针对Service黑盒监控配置
1
2
3
4
5
6
7
8
9
10
11
12
13
14
15
16
17
18
19
20
21
22
23
24
25
26
27
28
29
30
31
32
33
|
- job_name: "kubernetes-services"
metrics_path: /probe
params:
module:
- "http_2xx"
kubernetes_sd_configs:
- role: service
relabel_configs:
- action: keep
source_labels: [__meta_kubernetes_service_annotation_prometheus_io_http_probe]
regex: "true"
- action: replace
source_labels:
- "__meta_kubernetes_service_name"
- "__meta_kubernetes_namespace"
- "__meta_kubernetes_service_annotation_prometheus_io_http_probe_port"
- "__meta_kubernetes_service_annotation_prometheus_io_http_probe_path"
target_label: __param_target
regex: (.+);(.+);(.+);(.+)
replacement: $1.$2:$3$4
- target_label: __address__
replacement: blackbox-exporter:19115
- source_labels: [__param_target]
target_label: instance
- action: labelmap
regex: __meta_kubernetes_service_label_(.+)
- source_labels: [__meta_kubernetes_namespace]
target_label: kubernetes_namespace
- source_labels: [__meta_kubernetes_service_name]
target_label: kubernetes_name
|
更新 secret
1
2
| kubectl create secret generic additional-scrape-configs -n monitoring --from-file=prometheus-additional.yaml --dry-run=client -o yaml > additional-scrape-configs.yaml
kubectl apply -f additional-scrape-configs.yaml
|
确保 prometheus CRD 实例配置了 secret
1
2
3
4
| $ grep -A2 additionalScrapeConfigs prometheus-prometheus.yaml
additionalScrapeConfigs:
name: additional-scrape-configs
key: prometheus-additional.yaml
|
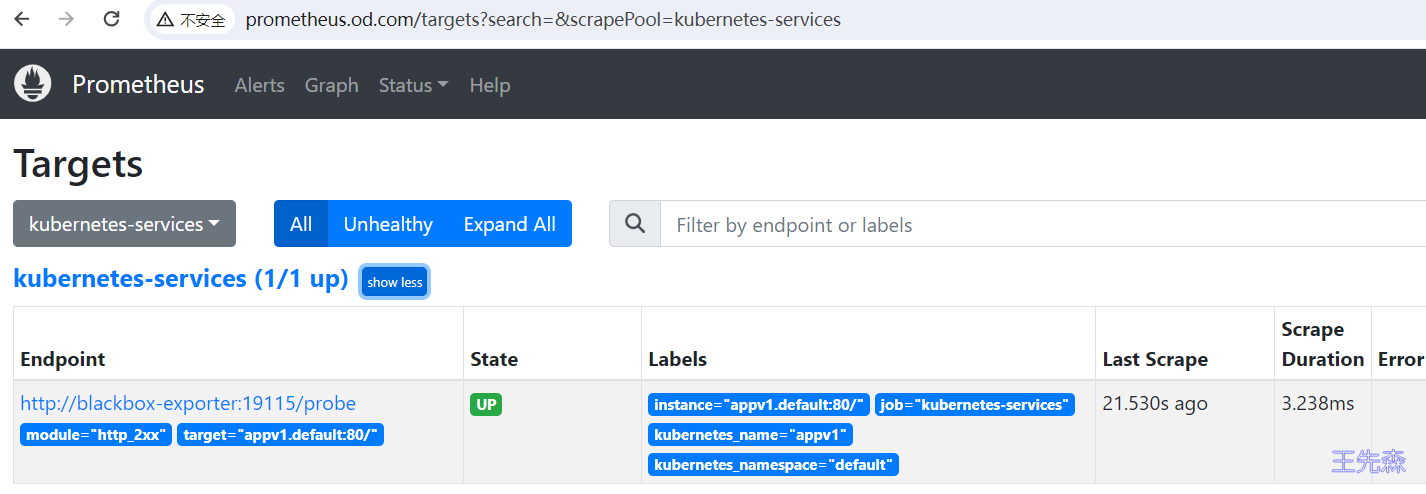
创建后同样可以在 Prometheus 、Blackbox 中看到对应的任务,可以看到只有 appv1 发现成功, 因为 whoami 没有配置 annotation。


通过probe_http_status_code{app="appv1"} 查看一下监测状态, 直接使用 <service-name>.<namespace> 访问, 在集群内是可以正常解析的, 所以这里 http 状态码为正常的 200

Ingress自动发现
修改ClusterRole ingress 是在networking.k8s.io 组中,需要添加对这个组的权限。
1
2
3
4
5
6
7
8
9
10
11
12
13
14
15
16
17
18
19
20
21
22
23
24
25
26
27
28
29
30
31
32
33
34
35
36
37
38
|
apiVersion: rbac.authorization.k8s.io/v1
kind: ClusterRole
metadata:
labels:
app.kubernetes.io/component: prometheus
app.kubernetes.io/instance: k8s
app.kubernetes.io/name: prometheus
app.kubernetes.io/part-of: kube-prometheus
app.kubernetes.io/version: 2.47.2
name: prometheus-k8s
rules:
- apiGroups:
- ""
resources:
- nodes/metrics
verbs:
- get
- apiGroups:
- ""
resources:
- services
- endpoints
- pods
verbs:
- list
- watch
- apiGroups:
- "networking.k8s.io"
resources:
- ingresses
verbs:
- list
- watch
- nonResourceURLs:
- /metrics
verbs:
- get
|
为 ingress 添加 annotation 注解
1
2
3
4
5
| $ kubectl edit ingress demo-web
annotations:
# 添加如下项
prometheus.io/http-probe: "true" # 用于控制是否监测
prometheus.io/http-probe-port: "80" # 用于控制监测端口
|
添加针对Ingress黑盒监控配置
1
2
3
4
5
6
7
8
9
10
11
12
13
14
15
16
17
18
19
20
21
22
23
24
25
26
27
28
29
30
31
32
33
|
- job_name: "kubernetes-ingresses"
metrics_path: /probe
params:
module:
- "http_2xx"
kubernetes_sd_configs:
- role: ingress
relabel_configs:
- action: keep
source_labels: [__meta_kubernetes_ingress_annotation_prometheus_io_http_probe]
regex: "true"
- action: replace
source_labels:
- "__meta_kubernetes_ingress_scheme"
- "__meta_kubernetes_ingress_host"
- "__meta_kubernetes_ingress_annotation_prometheus_io_http_probe_port"
- "__meta_kubernetes_ingress_path"
target_label: __param_target
regex: (.+);(.+);(.+);(.+)
replacement: ${1}://${2}:${3}${4}
- target_label: __address__
replacement: blackbox-exporter:19115
- source_labels: [__param_target]
target_label: instance
- action: labelmap
regex: __meta_kubernetes_ingress_label_(.+)
- source_labels: [__meta_kubernetes_namespace]
target_label: namespace
- source_labels: [__meta_kubernetes_ingress_name]
target_label: ingress_name
|
更新 secret
1
2
| kubectl create secret generic additional-scrape-configs -n monitoring --from-file=prometheus-additional.yaml --dry-run=client -o yaml > additional-scrape-configs.yaml
kubectl apply -f additional-scrape-configs.yaml
|
确保 prometheus CRD 实例配置了 secret
1
2
3
4
| $ grep -A2 additionalScrapeConfigs prometheus-prometheus.yaml
additionalScrapeConfigs:
name: additional-scrape-configs
key: prometheus-additional.yaml
|
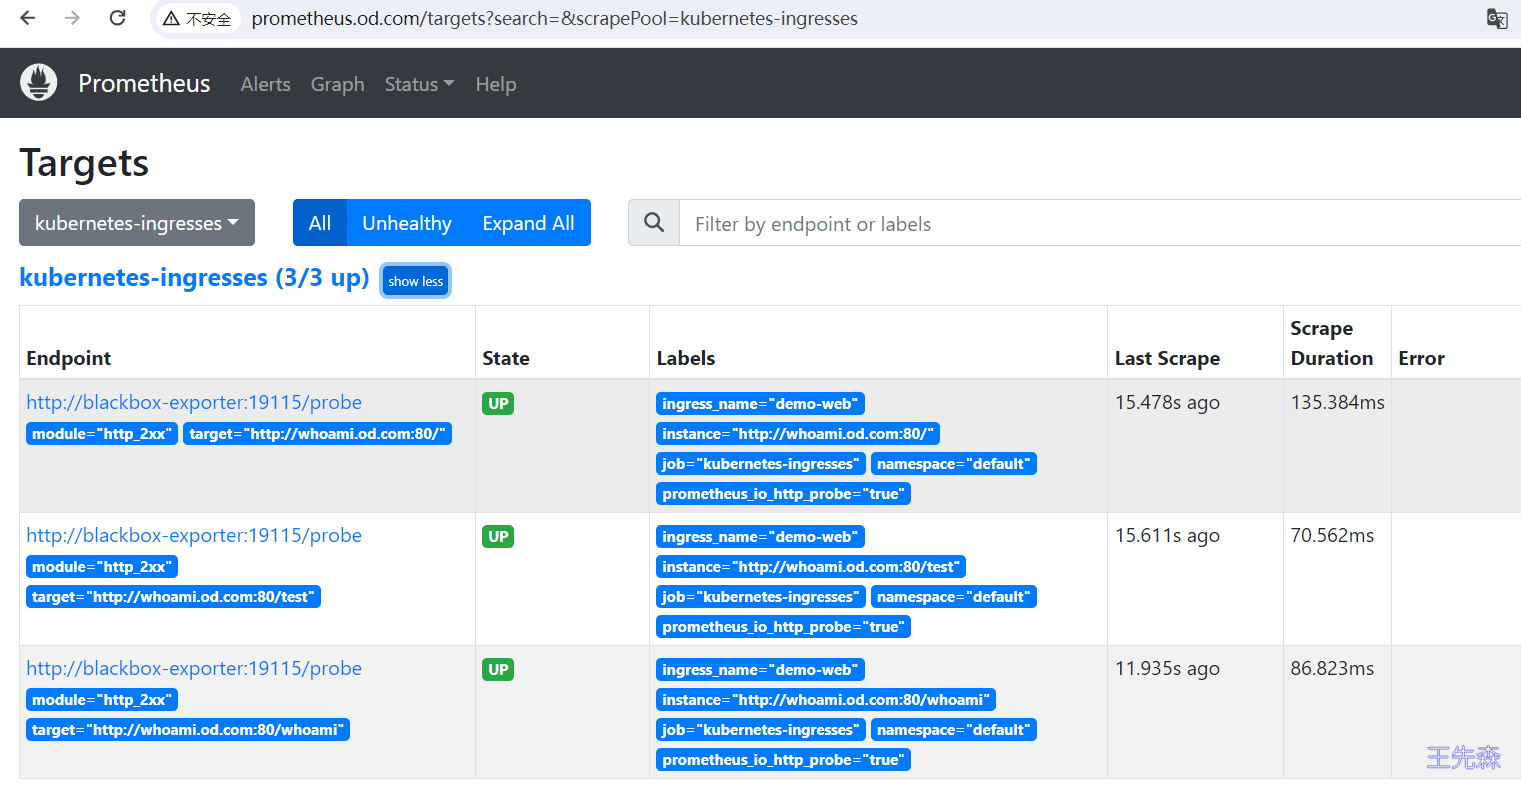
创建后同样可以在 Prometheus 、Blackbox 中看到对应的任务。

通过probe_http_status_code{ingress_name="demo-web"} 获取域名状态码信息,与预期配置一样。


